Before and After Furniture Makeovers: 8 Pairs + Sheets
Eight before and after furniture makeovers, paired side by side. Each one ships with a full materials sheet: paint, hardware, time, and budget. (2026)
Most before and after furniture makeovers stop at a thumbnail and a hashtag. You scroll, you save, and three weeks later you still don't know what paint, what primer, what pulls, or whether your weekend will cover it. This 2026 gallery fixes that.
Eight paired flips, eight materials sheets: technique, paint or oil (brand and price), hardware (type and source), active time, total budget. The "after" shots are AI-rendered on real "before" photos, so you can run the same preview on your own piece in Homeify before you crack a paint can. For the underlying methodology, the AI furniture makeovers methodology hub walks through finishes, prep, and 20 transformations in depth, while the ideas by style roundup sorts variations into five distinct registers.
How to read a before and after pair (and its materials sheet)
Same framing across all eight pairs: "before" on the left, "after" on the right, identical angle and focal length, so the only readable variable is the change itself. Underneath, the sheet gives you five lines — technique, paint or oil or wax, hardware, active time, materials cost without tools. Prices pulled in 2026 from Home Depot, Lowe's, IKEA, and Etsy, US national average.
The sheet is meant as a reproducible reference, not a brand mandate. If your local hardware store stocks a comparable acrylic enamel or chalk paint, the color and the sheen matter more than the label. For a tighter whole-room budget angle, see budget-friendly room makeovers. For the room-by-room before/after method, the before and after renovation guide takes over.
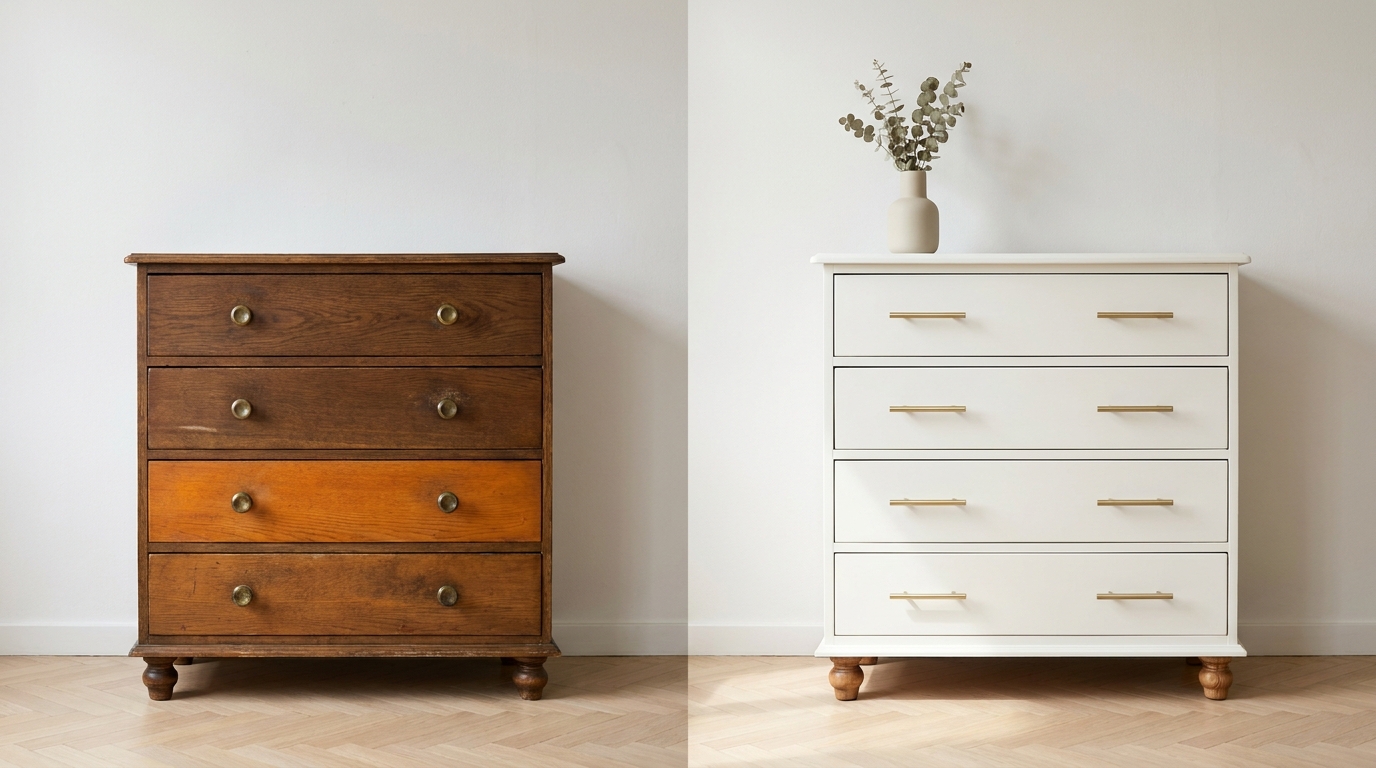
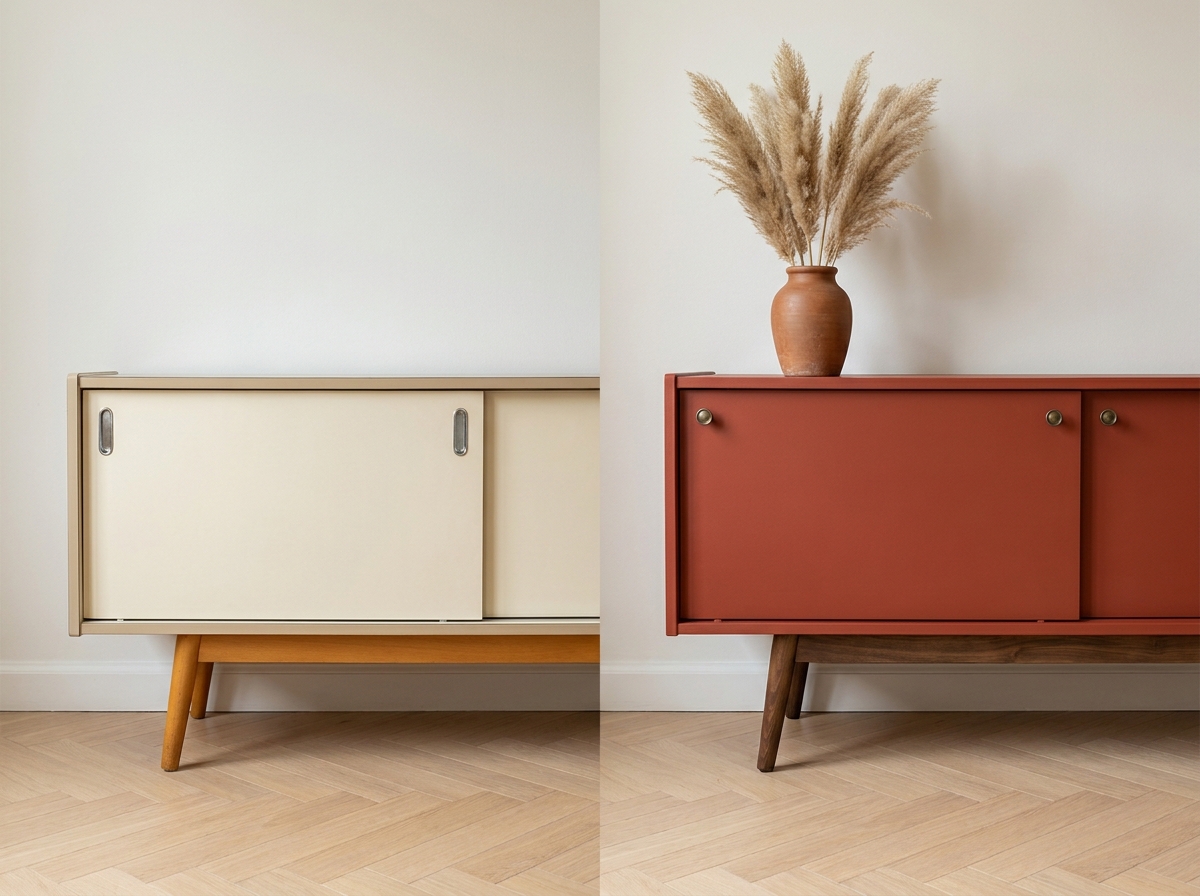
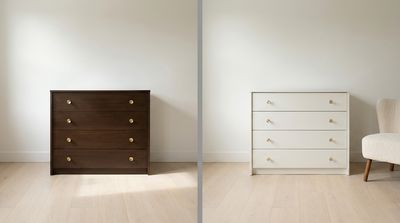
Dark oak dresser before and after — soft scandi white and brushed brass
Four-drawer dark-stained oak dresser, late seventies — the archetype people are searching for when they type before and after old bedroom furniture makeovers into Google: the bulky 70s oak box with brass knobs nobody wants, until it isn't. The "after" goes soft scandi white (Benjamin Moore Simply White) in a satin finish with 96 mm brushed brass pulls and the original tapered legs kept and resealed clear. Best dresser makeover painted furniture before and after for a low-effort, high-contrast result — try this on a scandinavian-style bedroom.
Materials sheet: bonding primer Zinsser 1-2-3 (1 quart, $14) and Benjamin Moore Advance satin in Simply White (1 quart, $20) in two thin coats, with light 220-grit sanding on edges only. Brushed brass pulls 96 mm × 4 (Lowe's, $2 each = $8). Process: pull the hardware, light scuff sand, prime, two satin coats. $42 / 3 hours of active time — plan a full day so you can respect the 4-hour recoat window.
Pine sideboard before and after — sage green and leather pulls
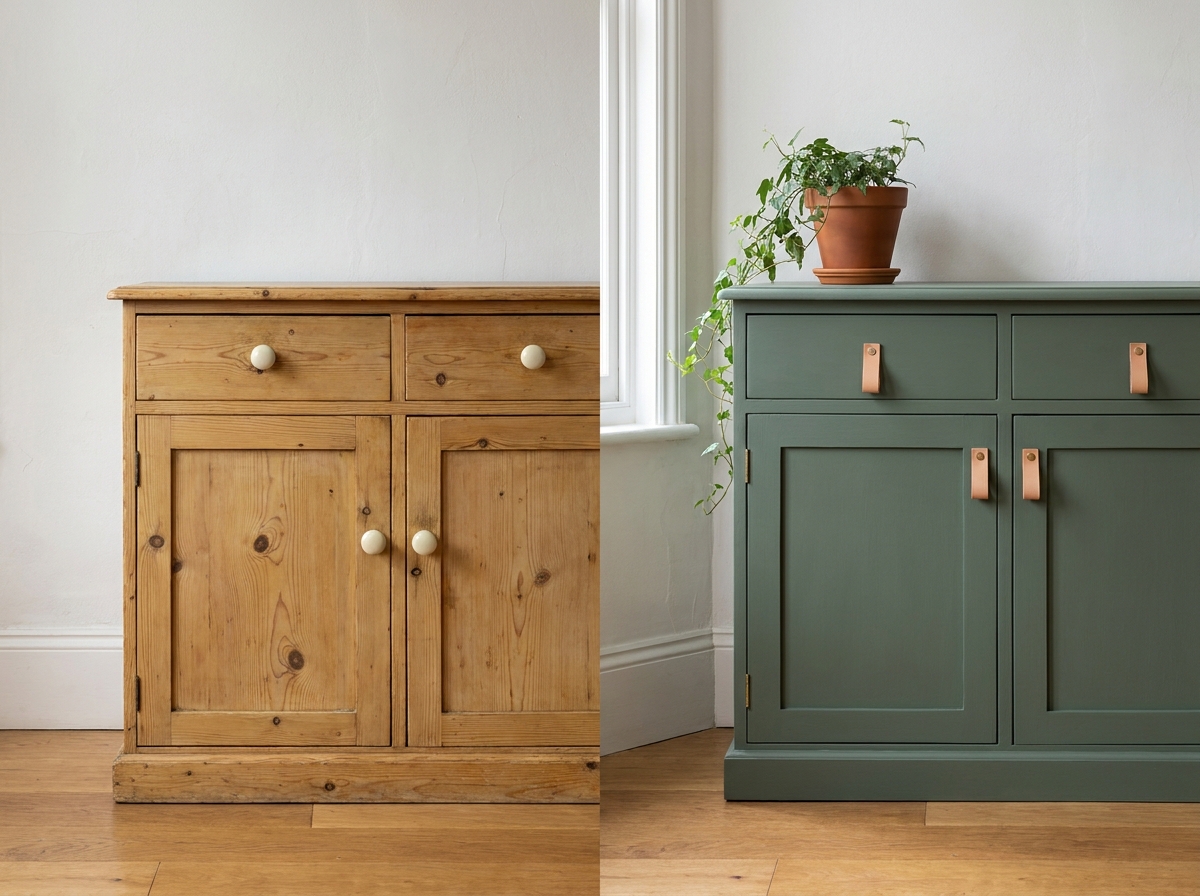
Two-door, three-drawer solid pine sideboard with knots yellowed by the original poly. The "after" goes sage green (Farrow & Ball Lichen No. 19 or Behr Sage Advice equivalent) in matte velvet, with vegetable-tanned leather pulls swapped in for the cheap ceramic knobs. Pine demands a tannin-blocking primer — skip it and you'll get yellow bleed-through in six months.
Materials sheet: tannin-blocking shellac primer Zinsser BIN (1 quart, $20), sage green matte (Farrow & Ball Lichen 1 quart, $30 or Behr equivalent at $24), leather pulls (Etsy, $4 each × 5 = $20), brass M4 screws. Process: degrease with TSP, sand 220, one cross-coated BIN coat, two thin matte coats. $58 / 4 hours — the only line you can't cheap out on is the BIN primer; it's what carries this finish past the five-year mark instead of failing in six months.
TV console before and after — raw oak feel and open cubbies
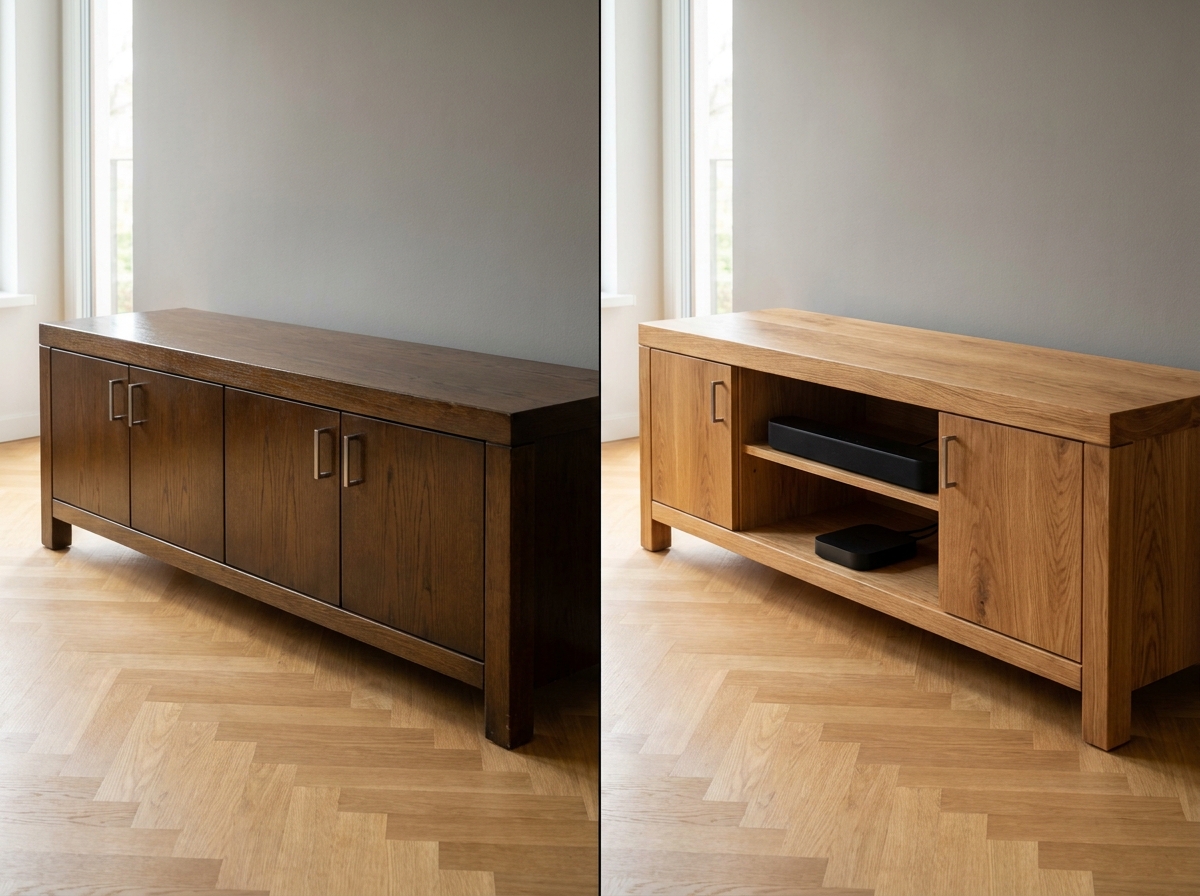
Low 63-inch oak-veneer TV console with a heavy nineties dark varnish. The "after" pulls the two center doors (now open cubbies for the cable box, the soundbar, the consoles) and brings the wood back to a raw oak feel by stripping the blackened varnish. The piece breathes again, the IR remote actually reaches the receiver, and the warm light wood replaces a yellowed amber. Lower-cost flip than it looks.
Materials sheet: gel stripper Citristrip (1 quart, $12), 120 → 180 → 220 sandpaper, clear hardwax oil Rubio Monocoat Pure or Watco Danish Oil natural (8 oz, $20-22) in two coats. Pull the two center doors first — one screw per hinge, mark before removal. $38 / 2 hours — the open cubby is irreversible, so test it on a photo first if you're not sure.
Cherry dining table before and after — natural oil or matte black lacquer
Solid cherry rectangular dining table, top scarred by twenty years of family meals. Two opposite directions. Direction one: Rubio Monocoat Pure in a single coat, letting the open grain breathe and the cherry warm with age. Direction two: matte black lacquer on the top with the original cherry legs preserved. The lacquer turns a tired hand-me-down into a graphic centerpiece.
Materials sheet (oil option): gel stripper 1 quart ($12), sand 120 → 240, Rubio Monocoat Pure 12 oz ($38) in one coat (the brand promises one coat only), cotton wiping cloths. $62 / 3 hours active — Rubio cures five days before normal use, not four hours, so plan around the dining schedule. Lacquer option: bonding primer plus two-pack matte black satin top coat ($52) and the top is back in service after 48 hours.
Bistro chair before and after — emerald velvet seat and matte black frame
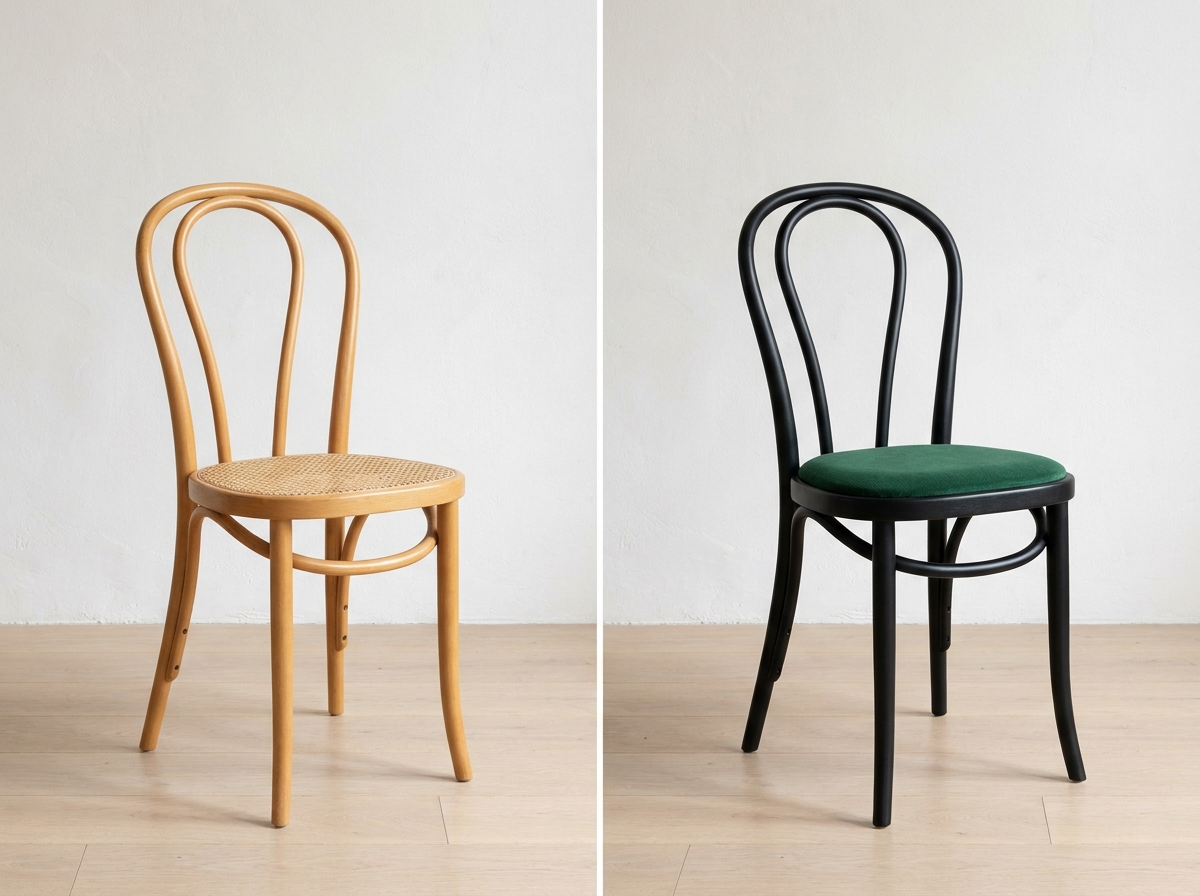
Bentwood Thonet-style bistro chair, cane seat sagging or split — the chair you find at every estate sale for $15. The "after" rebuilds the seat as a padded square in emerald velvet, frame painted deep matte black (direct-to-wood enamel, no separate primer). Highest transformation-to-effort ratio in the entire gallery.
Materials sheet: 8 mm plywood seat base cut to template ($6), 1.5-inch high-density foam ($9), emerald velvet 20 × 20 inch (Joann Fabric, $11), staple gun. Black matte enamel Rust-Oleum Universal 8 oz ($10) in two coats direct to wood. $34 / 3 hours per chair — and if you're flipping four matching dining chairs, that's $136 for a full set, hardware to seat.
Tall wardrobe before and after — disappear into the wall
Tall two-door carved wardrobe — the kind of piece you inherit and don't know where to put. The "after" paints the wardrobe in the exact wall color, letting the volume "disappear into the wall" visually. The room gains breathing space and the wardrobe stops dominating. Interior designers use this in small bedrooms — and if the piece is heavily inherited, the heritage furniture playbook maps the keep-or-flip decision before you commit.
Materials sheet: bonding primer 1 quart ($24), wall-and-trim paint 1 gallon (Sherwin-Williams ProClassic or Benjamin Moore Aura, $52) for two coats plus the surrounding wall touch-up. Original hardware kept and clear-matte sealed for relief texture. $72 / 5 hours — cost climbs because you also paint the adjacent wall surface so the colors match under evening light.
Formica buffet before and after — terracotta revived and aged brass
Cream sixties Formica buffet, hairpin legs in stained beech. The "after" goes terracotta revived — riding the warm-decor wave that's still strong into 2026 — with hairpins re-stained walnut and pulls swapped for aged brass. Formica is the one substrate where the bonding primer is non-negotiable; skip it and the paint chips off the first time you set down a hot mug.
Materials sheet: degrease with rubbing alcohol then very light 220 sand, bonding primer Zinsser 1-2-3 designed for slick surfaces (1 quart, $18), terracotta matte velvet (Sherwin-Williams Cavern Clay or equivalent, 1 quart, $26) in two very thin coats. Aged brass pulls (Etsy, $3.50 each × 4 = $14). $48 / 4 hours — the trick is keeping the second coat thin. Never lay down one heavy coat on Formica; it will sag and cure soft.
Teak coffee table before and after — mid-century reboot
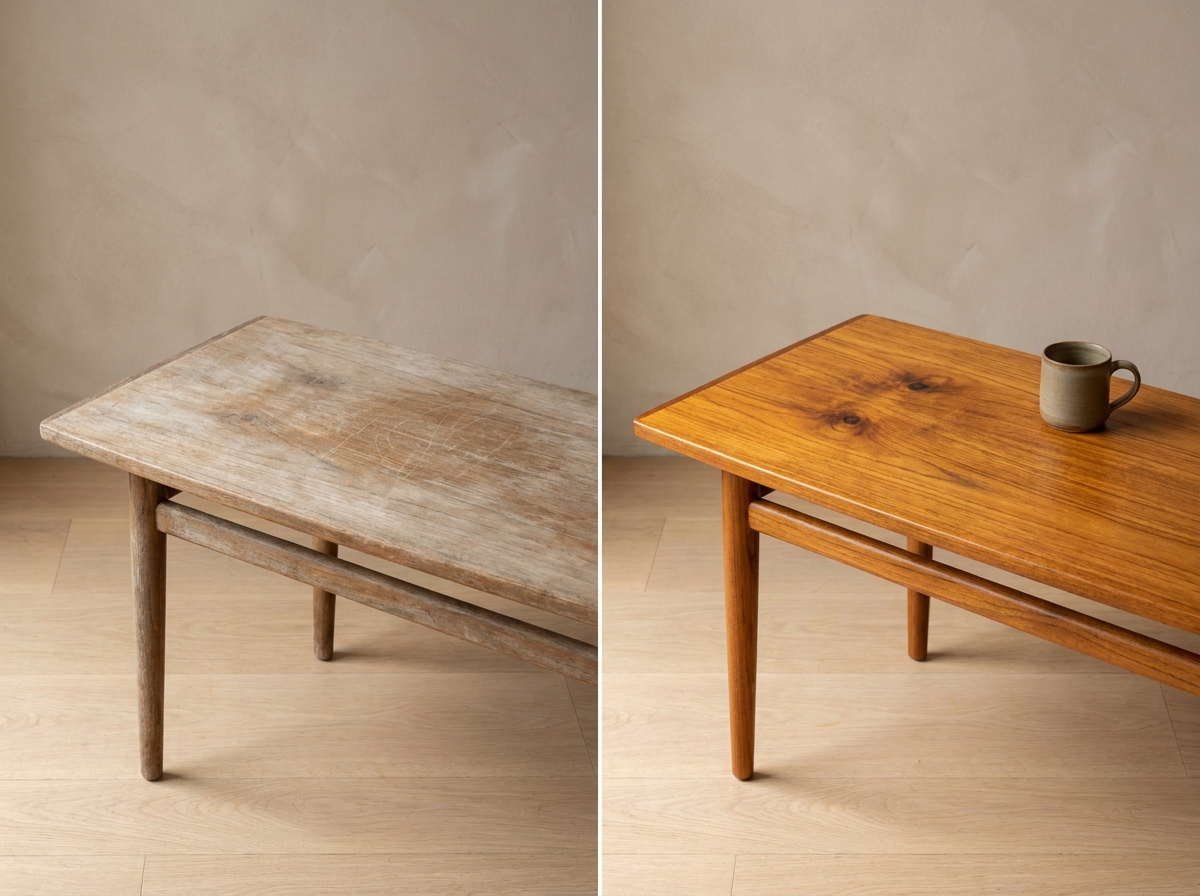
Solid teak sixties coffee table, top sun-grayed and scratched. Back to original teak with Watco teak oil + wax — never paint a teak, ever. The orange-honey grain that comes up under oil is the mid-century modern signature no paint job can fake. Fastest flip in the gallery.
Materials sheet: 120 → 220 → 320 sandpaper ($8), Watco teak oil 8 oz ($11), clear paste wax (Minwax 1 lb, $9), cotton cloth. Process: cross-grain sand in three grits, dust off, one saturation coat of oil, wipe off after 15 minutes, paste wax 24 hours later. $28 / 2 hours — best effect-to-effort ratio of all eight. A wasted thrift flip costs you a weekend plus roughly $60 in primer, paint, and hardware before you ever notice the finish failed; sanding a teak top back instead avoids that whole line item.
| Piece | Transformation | Active time | Materials cost |
|---|---|---|---|
| Dark oak dresser | Soft scandi white + brushed brass | 3 h | $42 |
| Pine sideboard | Matte sage green + leather pulls | 4 h | $58 |
| TV console | Raw oak feel + open cubbies | 2 h | $38 |
| Cherry dining table | Rubio Monocoat oil (or matte black) | 3 h | $62 |
| Bistro chair | Emerald velvet + matte black frame | 3 h | $34 |
| Tall wardrobe | Disappear into the wall (same color) | 5 h | $72 |
| Formica buffet | Terracotta revived + aged brass | 4 h | $48 |
| Teak coffee table | Watco oil + paste wax (teak revived) | 2 h | $28 |
FAQ
What materials do I need for a furniture makeover?
On sound solid wood: matte or satin acrylic enamel (Benjamin Moore Advance, Sherwin-Williams ProClassic, Behr Premium) in two thin coats over a light scuff sand. On veneer, melamine, Formica, or resinous pine: a bonding primer (Zinsser 1-2-3, INSL-X Stix, or Zinsser BIN for tannin bleed) is non-negotiable. Chalk paint (Annie Sloan, Rust-Oleum) bonds to oak and cherry without primer but needs a wax refresh every 18 months.
How long does a before and after furniture makeover take?
Across the eight pairs above, plan 2 to 5 active hours per piece. Total calendar time = active hours plus drying (4 hours between coats, 24 hours before light use, 5 days for a Rubio Monocoat cure). Block off a weekend for a sideboard or wardrobe; a chair is a half-day project.
How much does a DIY furniture makeover cost?
In 2026, a standard solid-wood flip (oak, cherry, pine) runs $28 to $72 in materials excluding tools. The line items that push the budget up: shellac primer ($18-22), high-end pulls ($4-7 each), and Rubio Monocoat ($38). Average across the eight pairs above: $48.
Do I need to sand furniture before painting?
Yes — a light scuff sand at 180 to 220 grit is enough on 9 pieces out of 10. You're not stripping back to bare wood; you're just opening the surface so the bonding primer can grab. Bare wood: 120 → 180 → 220. Veneer or Formica: a 220 scuff and then a bonding primer (never strip — you'll cut through the veneer). Gel-strip only when you intend to refinish back to natural wood.
Which before and after furniture makeovers are easiest for beginners?
From this gallery, the bistro chair, the teak coffee table, and the TV console are the three lowest-risk starts. The chair is small, mistakes are cheap, and the upholstery part is forgiving. Teak is a wipe-on oil with no brushwork. The TV console is a single-day strip-and-oil with no color choice to second-guess. The hardest of the eight is the wardrobe (color-matching the wall). A useful pre-step: photograph the piece in its room, open Homeify, and try the finish on your actual photo before you buy a single can — a wrong $35 quart of paint is the most common mistake on the very first flip.
Test your own before and after with Homeify
Every pair above started from a real "before" photo. With Homeify, you preview scandi, mid-century, industrial, minimalist, or boho on your own piece — not on a stranger's living room. Keep the version that works in your light, then run the materials sheet without throwing money at the wrong paint can. For the deeper room-by-room playbook, the AI furniture makeovers methodology hub maps 20 reference flips end to end.
Related Articles
Was this article helpful?
Download Homeify Free
Transform any room with AI — download Homeify and start redesigning your home for free. The AI room design app trusted by thousands on iOS.
