Before and After Old Furniture Makeover: 20 AI Flips
20 AI before and after furniture makeovers on 5 real pieces, 4 finishes each. Paint, wax, two-tone, new hardware. Test on your photo before you sand.
A good before and after old furniture makeover starts the same way in 2026: you preview the finish on a photo of your actual piece before the sandpaper ever touches the wood. This guide walks through 20 AI-generated flips made in Homeify on five real pieces — so you can decide on the finish before you spend a dime at the paint aisle.
Skip the guesswork — preview 20 finishes before you sand
Across the 20 flips below, only one thing changes from frame to frame: the finish. The starting piece, the camera angle, and the light are identical in every pair. That is the honest way to compare — and it is exactly what inspiration boards and artisan portfolios cannot show you, because they stack wildly different pieces shot in different rooms with different light. Here you get four versions of the same brown dresser, four versions of the same oak sideboard, four versions of the same cherry table. You choose with your eyes open.
The stakes are real. A weekend furniture flip costs $40 to $180 in supplies (paint, primer, wax, pulls, sandpaper) and burns a whole Saturday or two. Picking the wrong color means starting over — or living with the regret. Before you commit, drop a photo into Homeify and try it on. The app renders 20 finishes on the same piece in under a minute. What follows is a written walkthrough of each direction, style by style, so you know which ones to try first. Giving old wood a second life keeps furniture out of the landfill — the EPA estimates Americans throw out more than 12 million tons of furniture every year — and on Homeify, 85% of users end up picking a different finish than the one they had in mind at the start.
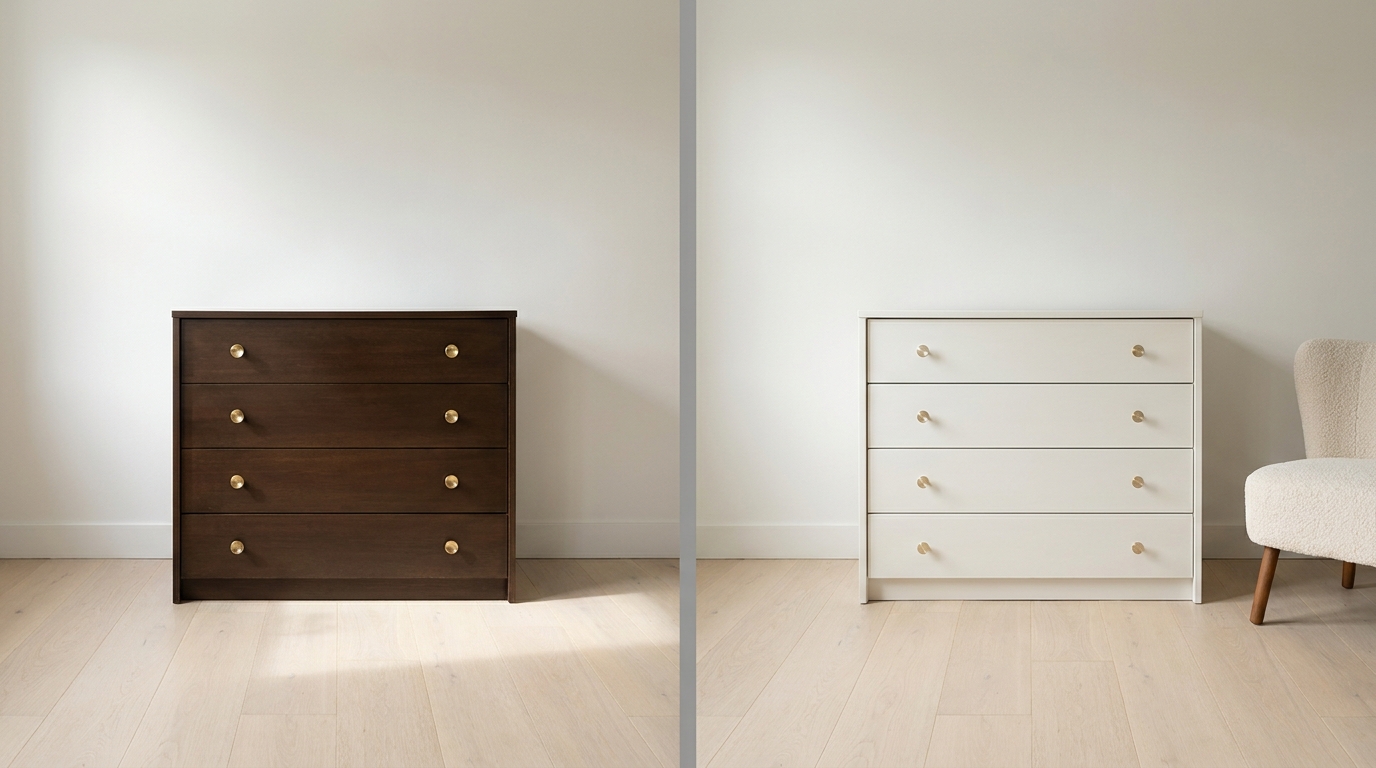
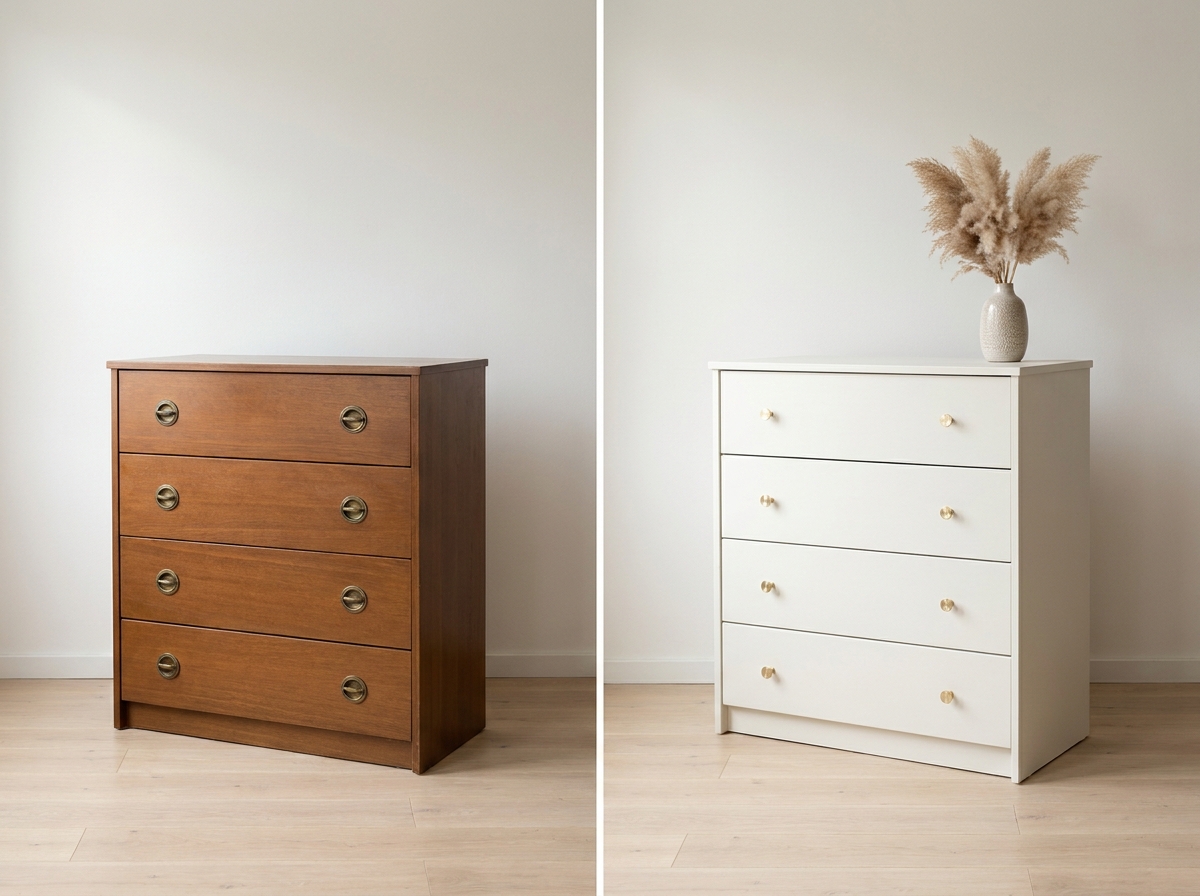
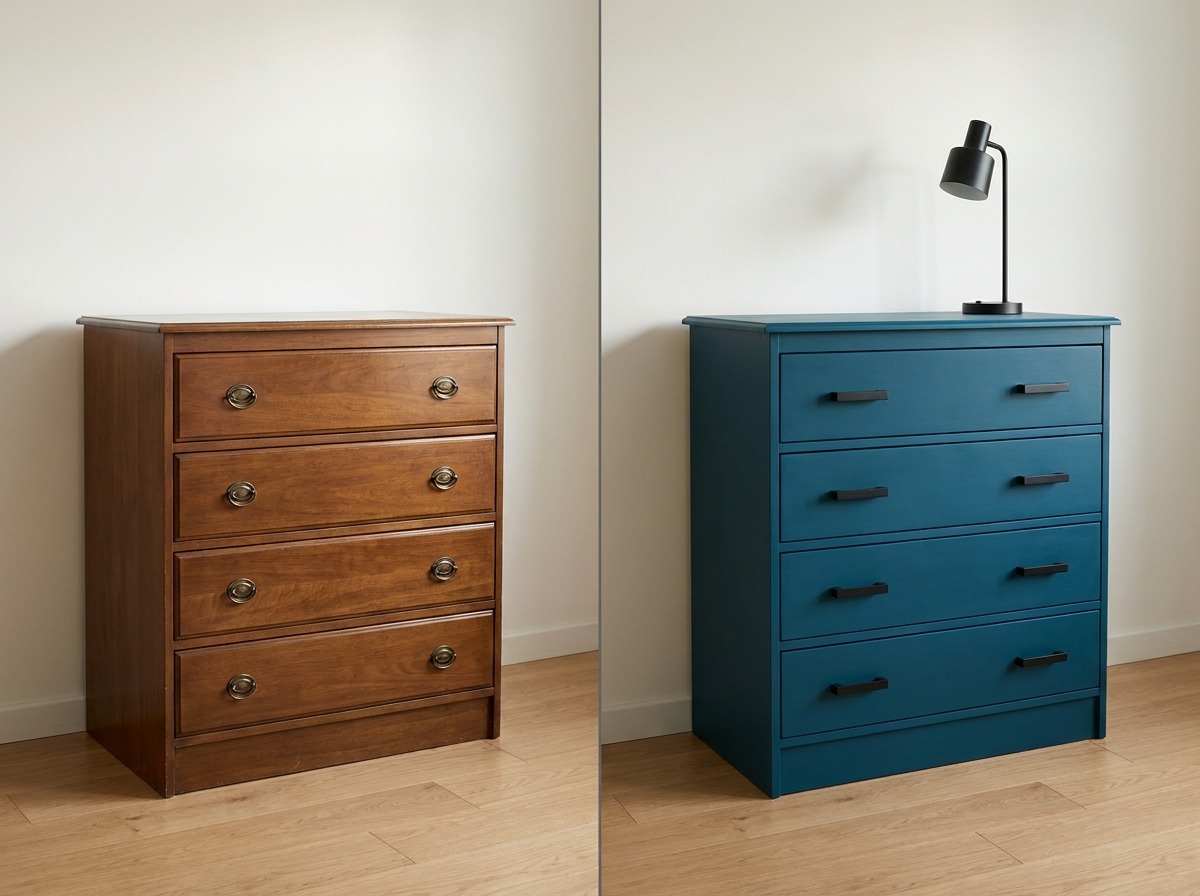
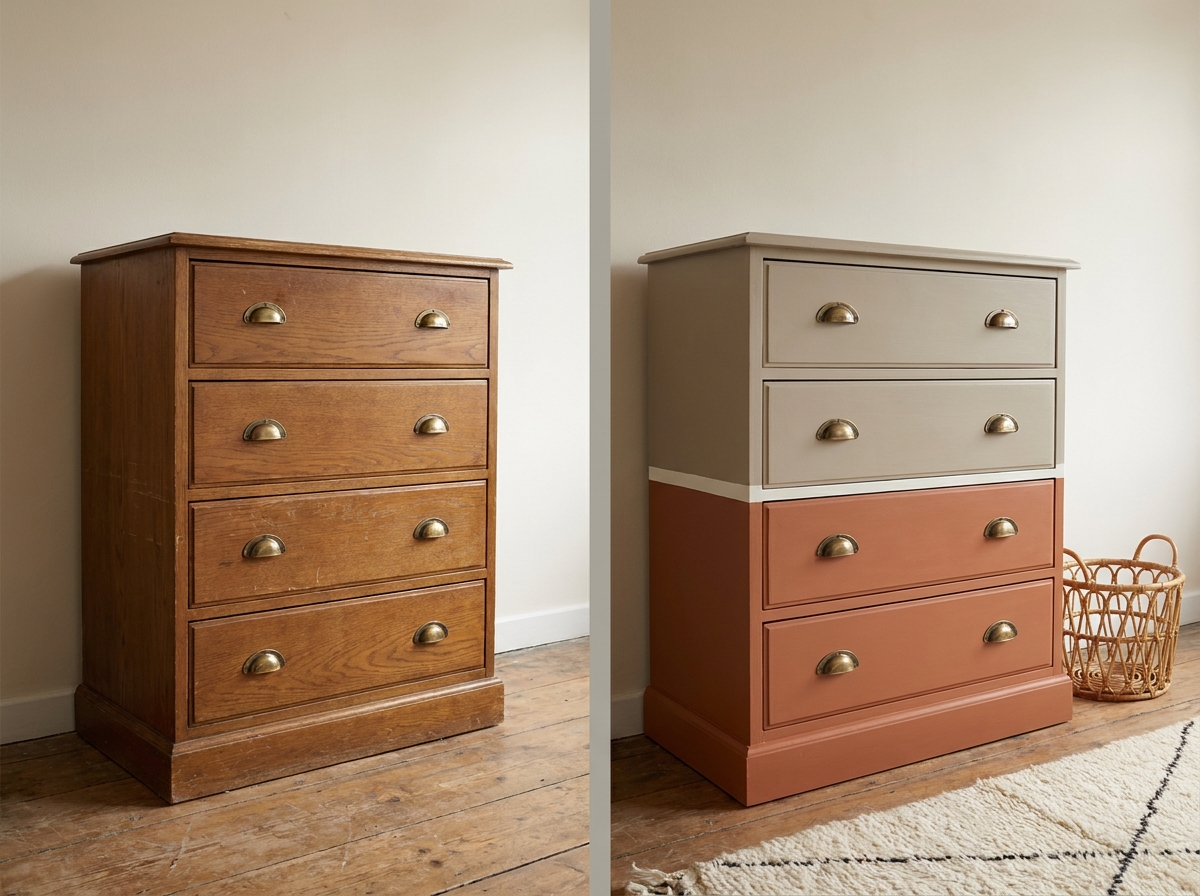
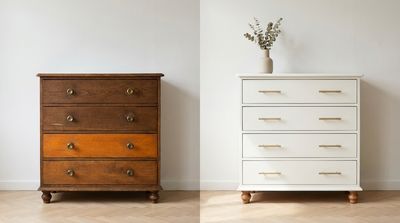
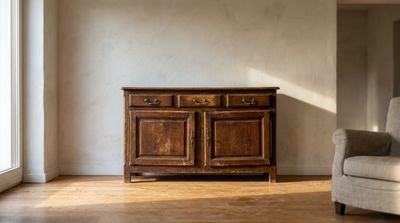
Dresser before and after: 4 finishes on the same piece
Starting point: a plain brown dresser with flat drawer fronts — the kind that shows up in every thrift store for $50, or turns up in a grandparent's estate. Four directions are on the table without touching the structure — just paint, wax, and hardware.
1a — Scandi: off-white matte + brushed brass
Matte acrylic in off-white matte + brushed brass pulls, round knobs. Light 180-grit scuff first, then two thin coats. The finish opens up a small bedroom and plays well with light oak flooring and a wool boucle throw. A natural fit for a Scandinavian bedroom or a bright entryway.
1b — Modern: deep teal + flat-black pulls
Same dresser, finished in deep teal + flat-black pulls in rectangular slim bars. Teal has been the most-tested color on Homeify for living-room pieces so far in 2026, edging out sage green. Lay down a bonding primer first so the blue covers in two coats instead of three.
1c — Vintage: clear wax, wood on display
No paint here. Citrus stripper to pull the old finish, then 120-grit followed by 240, then clear natural wax worked in with a soft cloth. The raw grain comes through, the original pulls get polished and go back on. This is the direction that respects the piece the most — and by far the slowest one (budget a solid 6 to 8 hours of hands-on work).
1d — Boho: two-color greige + terracotta
The 2026 sleeper hit: greige body + terracotta on the bottom two drawers. Soft contrast, vertical read. Works with a Berber rug and a warm bohemian bedroom. Careful taping on the drawer edges is the whole game on this one — a wavy line ruins the effect.
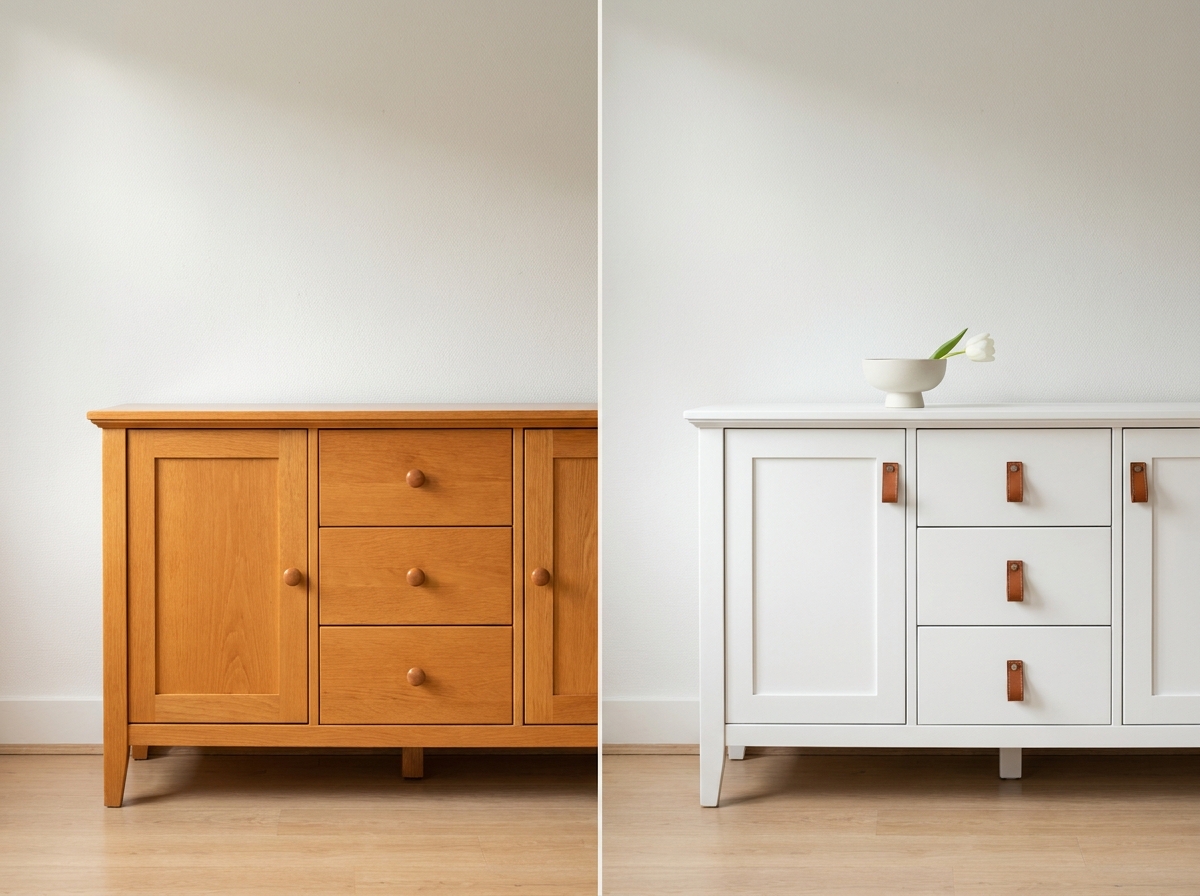
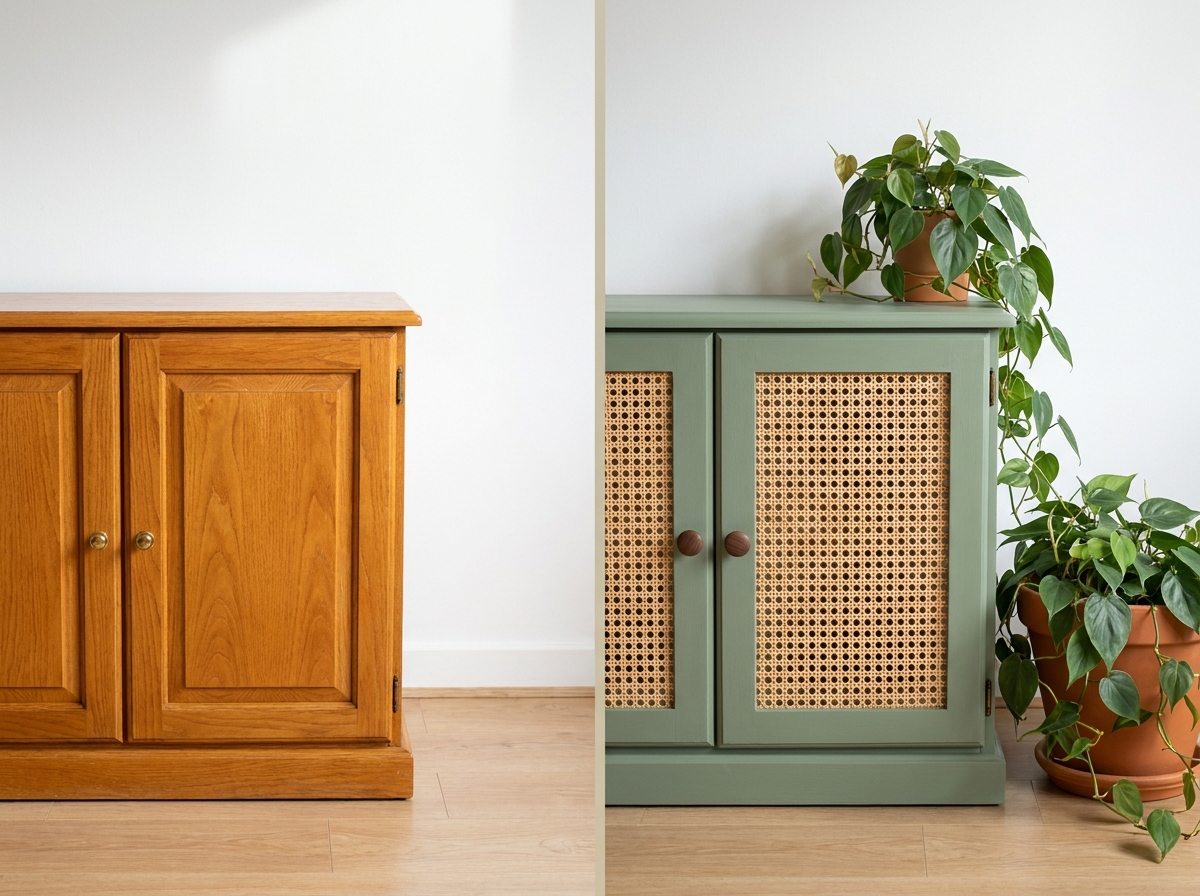
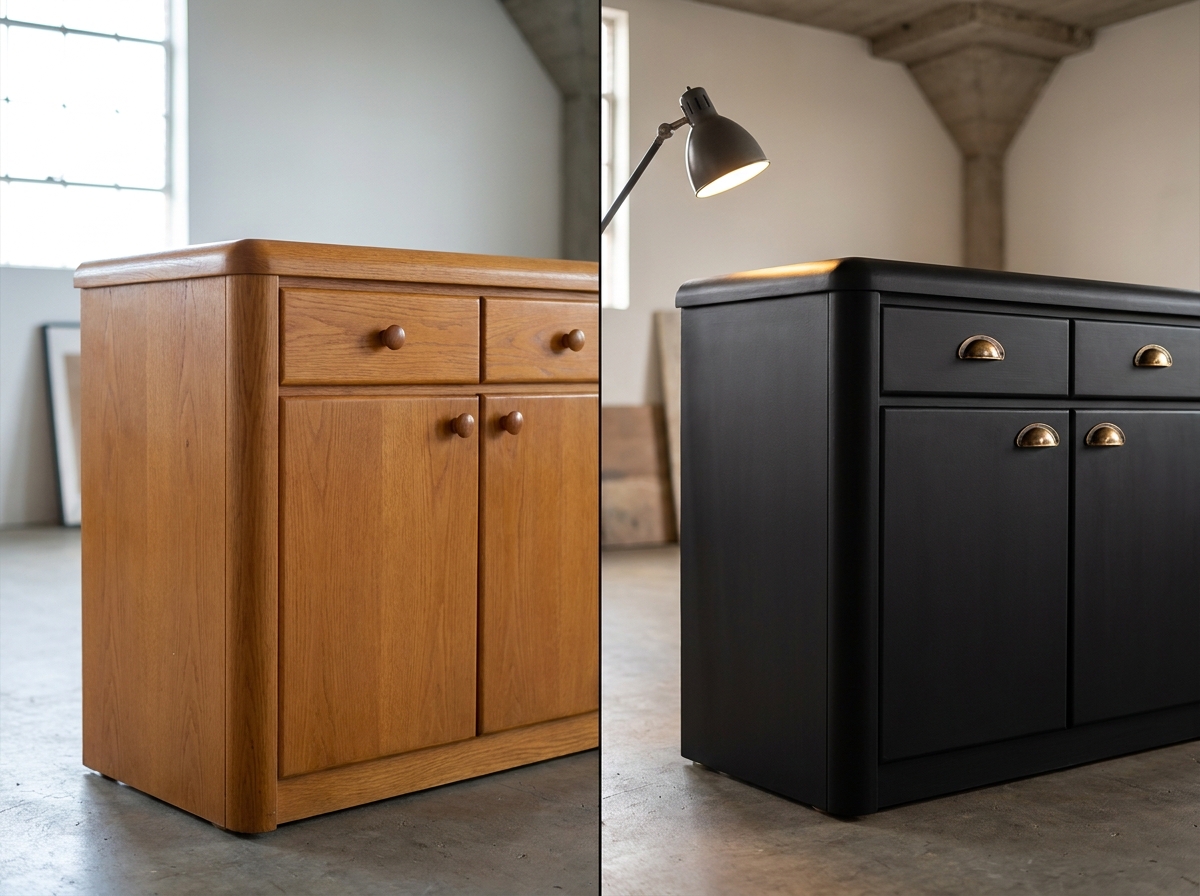
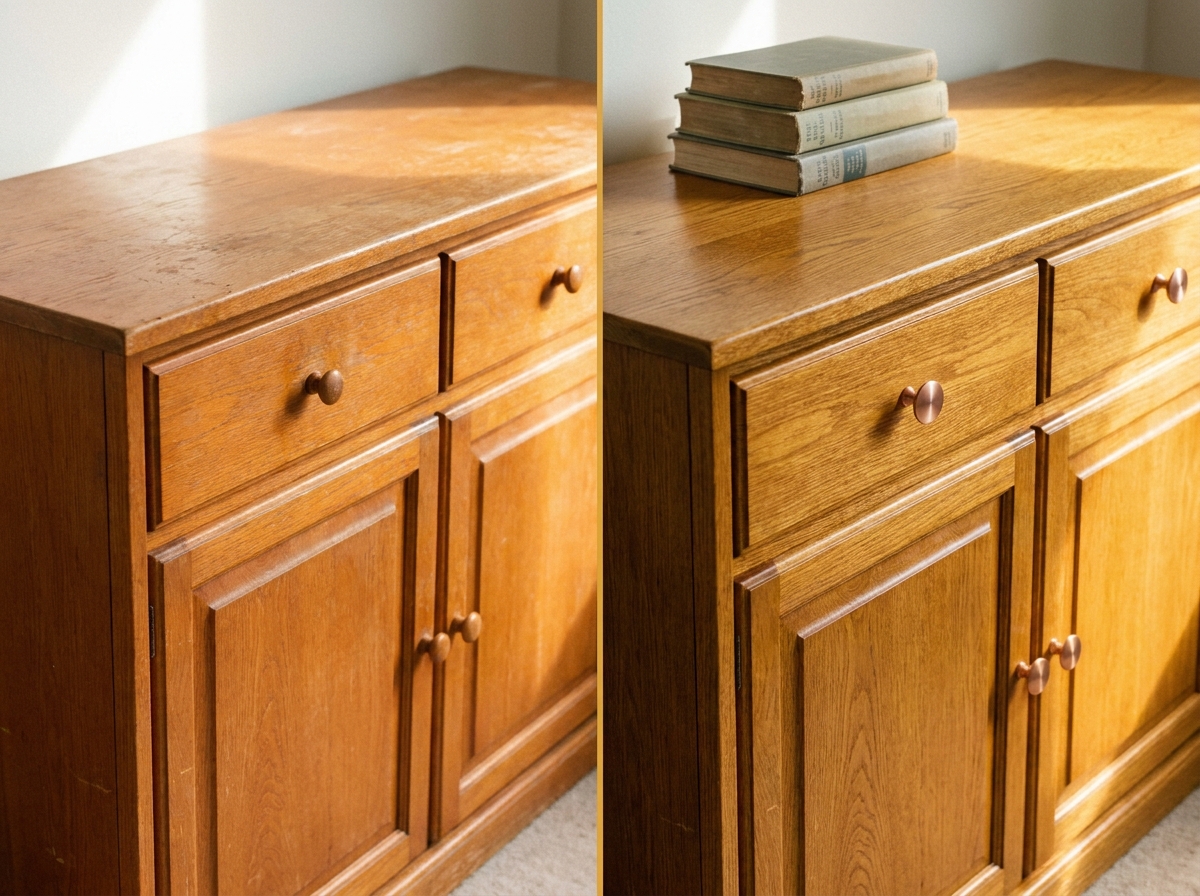
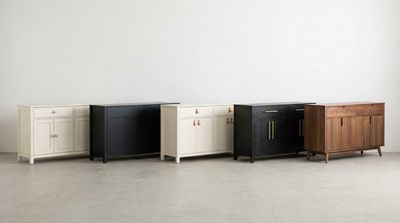
Sideboard before and after: 4 styles on one orange-oak buffet
Starting point: an oak sideboard in that typical 1990s orange oak, the kind your parents had in the dining room or the kind that lists for $80 on Facebook Marketplace every weekend. The surface is sound, the carcass is solid — only the tone has aged out.
2a — Scandi: flat white + cognac leather pulls
Finished in flat white + cognac leather pulls (hand-stitched, about $12 each on Etsy or at a well-stocked hardware store). The orange disappears under two coats and the leather brings warmth back in a controlled way. A solid fit for a dining nook or a narrow entry.
2b — Boho: sage green + cane door fronts
Paint in sage green + caned door fronts cut to size and glued on with contact cement. The caning adds texture and breathes air into a heavy piece. This reads beautifully in a living room with trailing plants and a jute rug.
2c — Industrial: flat black + aged-brass shells
The most dramatic swing: flat black + aged-brass shell pulls. The orange oak becomes a piece you would expect to see in a loft. It pairs with an off-white wall and a matte black pendant. See also: industrial style.
2d — Vintage: varnish refreshed + copper pulls
Zero paint on this one: a fine 220-grit sanding, then a wipe-on coat of clear satin reviving varnish. Swap the original pulls for brushed copper. The piece recovers its shine without losing its story — the direction to pick if the sideboard was a gift from family.
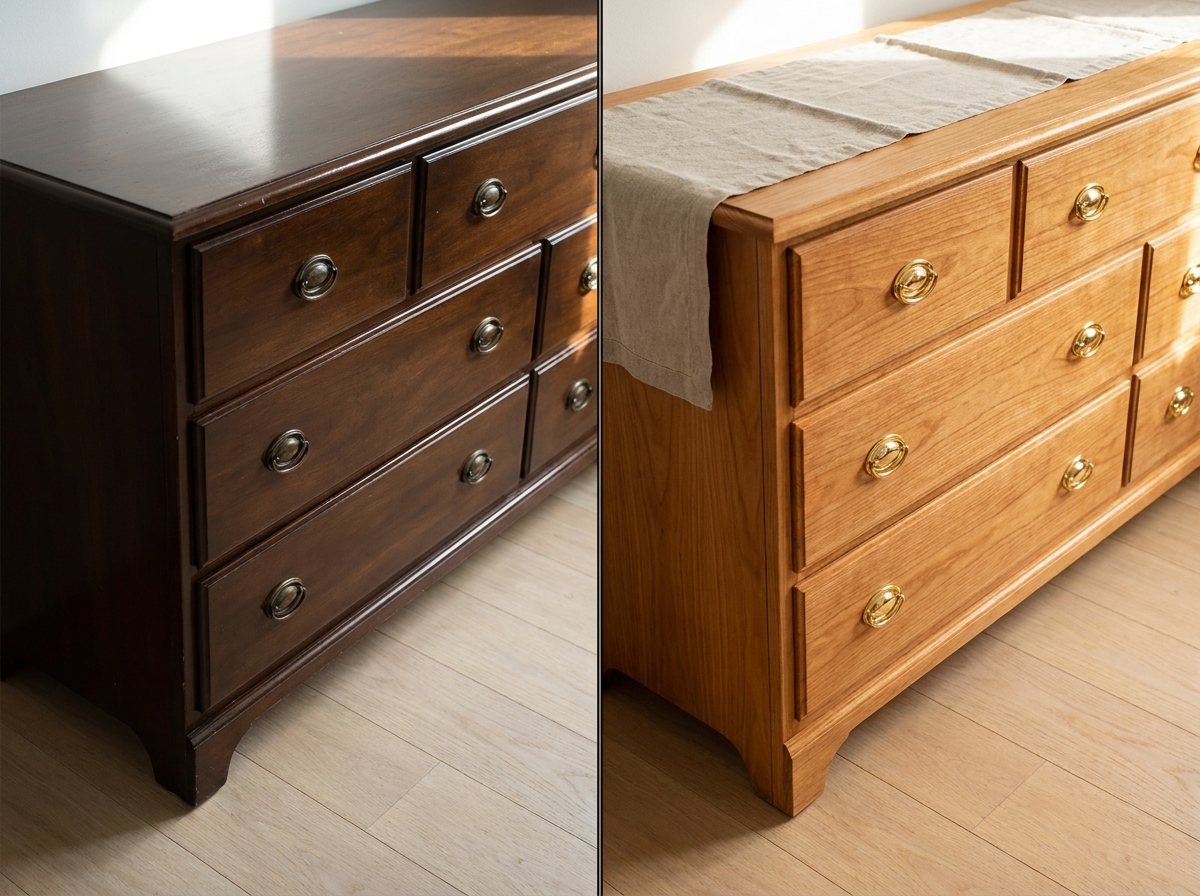
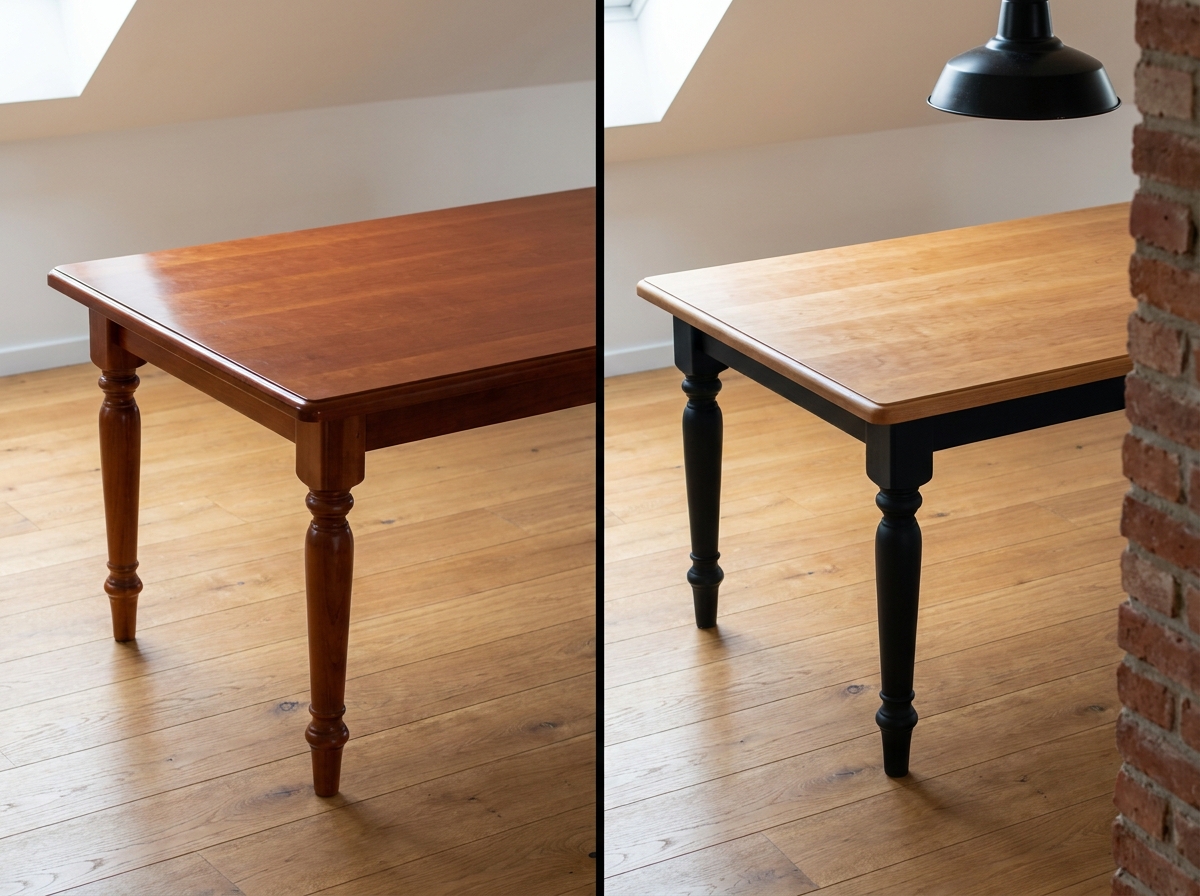
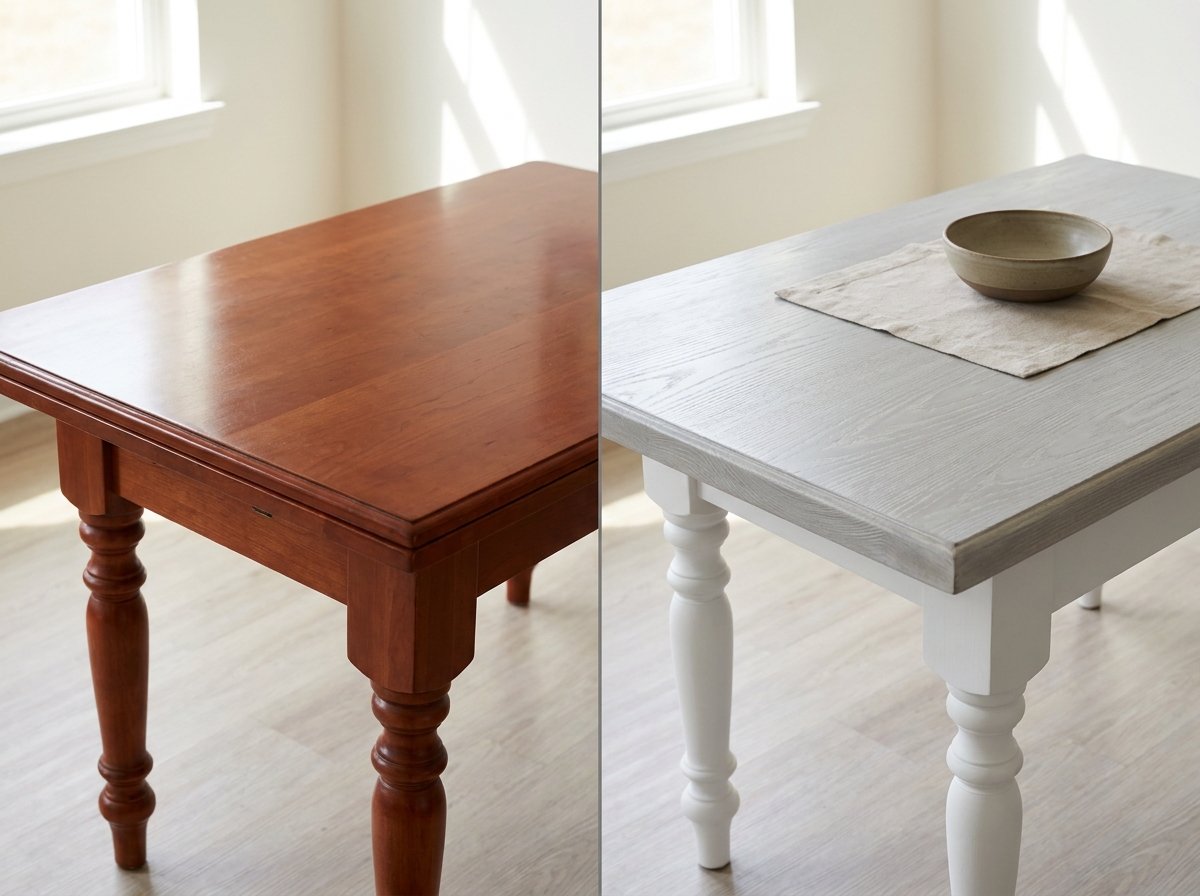
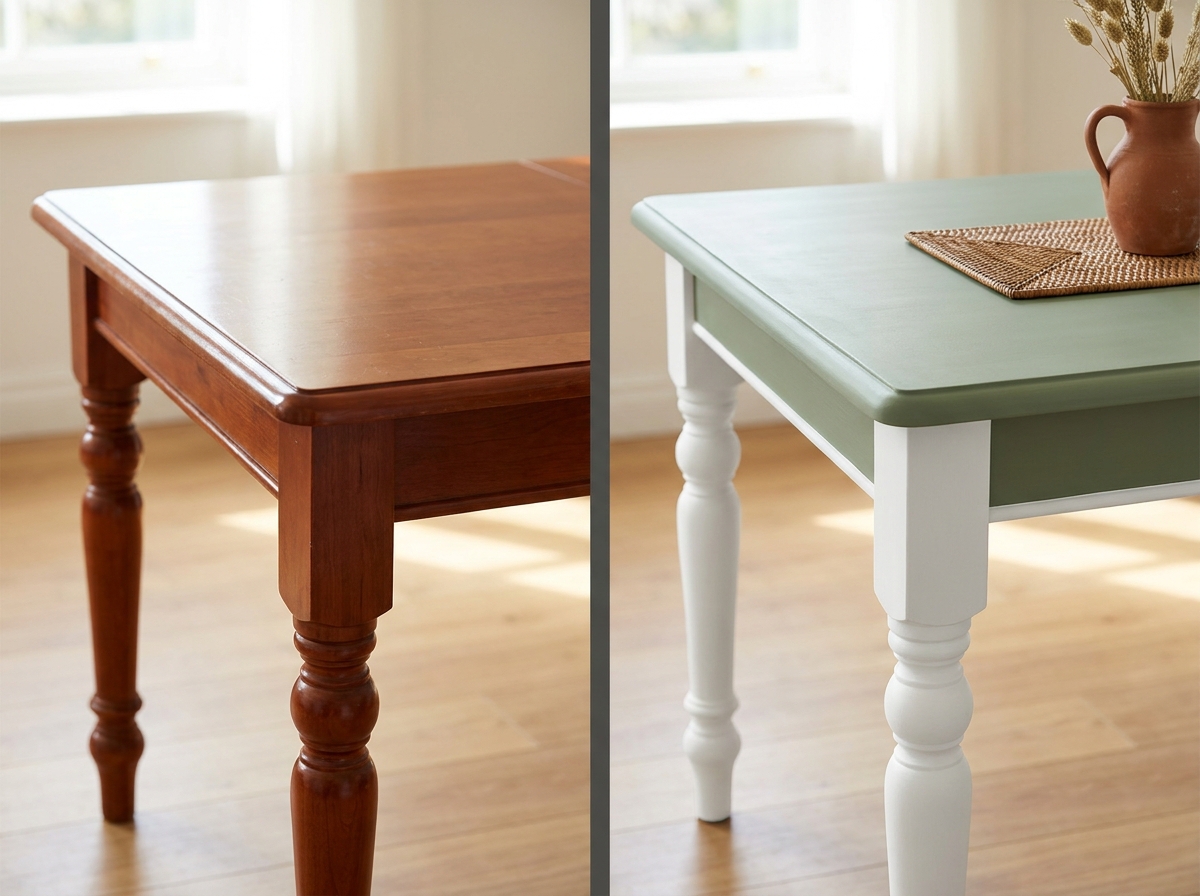
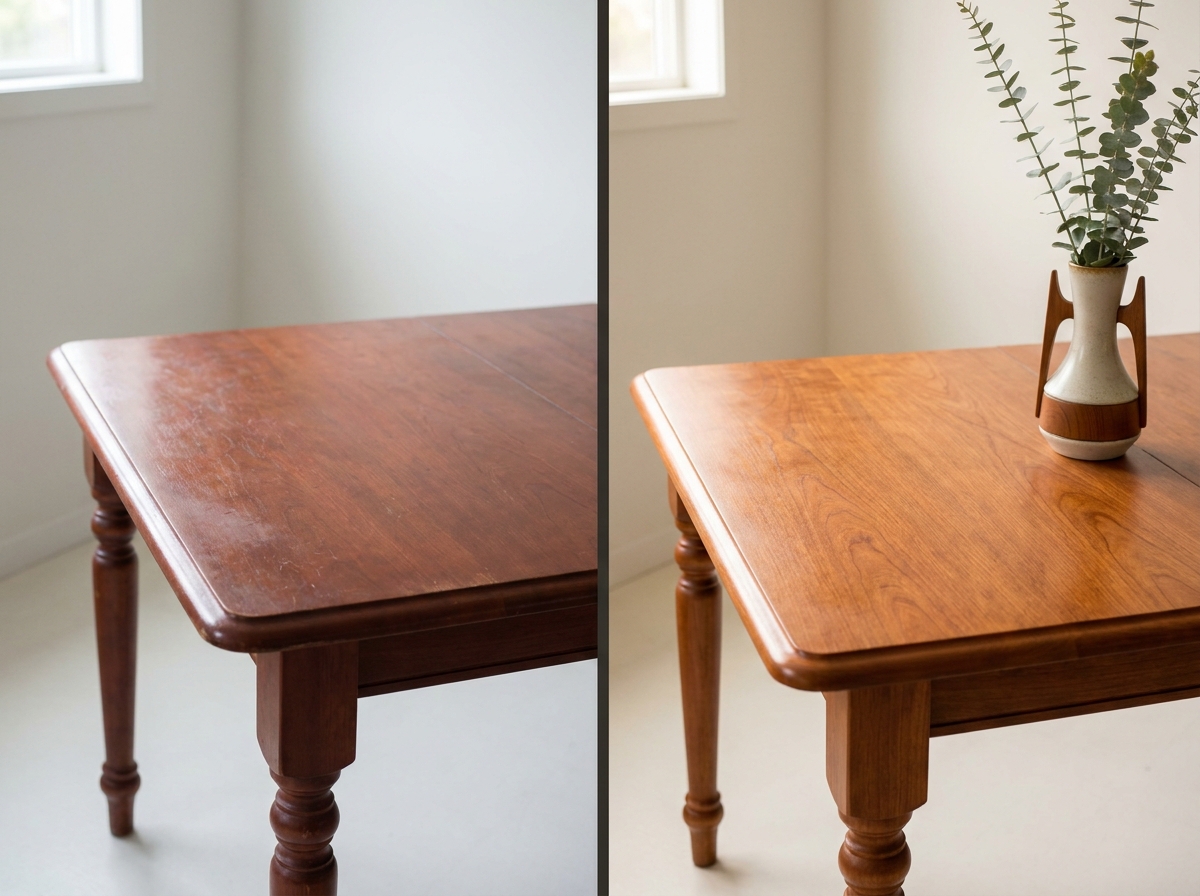
Dining table before and after: from red cherry to limed top
A red-brown cherry from the 1980s is the hardest piece on this list to flip cleanly: tannins in cherry bleed through white paint and leave yellow halos after a few weeks. A shellac-based blocking primer is non-negotiable on this wood.
3a — Industrial: black legs + raw waxed top
Two-tone treatment: black-matte legs + raw waxed top. Strip the top down with 80-grit and finish with 180 to bare wood, then seal with oil-based wax. The contrast looks right in a room with exposed brick or heavy beams.
3b — Scandi: white legs + limed pearl-gray top
Finished with white legs + limed pearl-gray top (white liming wax worked into the open grain). The cherry grain stays visible underneath the wash, and the whole table lightens without losing character. Perfect for an open kitchen.
3c — Boho: two-tone white + sage top
A clean two-color split: white legs + sage green top. The green breaks up the mass of the cherry and makes the top feel like a design choice rather than a leftover. Works in a sunroom or a dining room with linen curtains.
3d — Mid-century: clear linseed oil only
The minimalist version: a wipe-on coat of clear linseed oil with a soft cloth, nothing else. The red-brown softens into a patina without disappearing. Pair it with a mid-century modern room and shell chairs.
Bistro chair before and after: 4 finishes on one round seat
The orange-varnished beech bistro chair (Thonet-style bentwood, around $25 at flea markets and estate sales) is the easiest piece to transform. Flip one as a test run before you commit to a full set of four for the dining room.
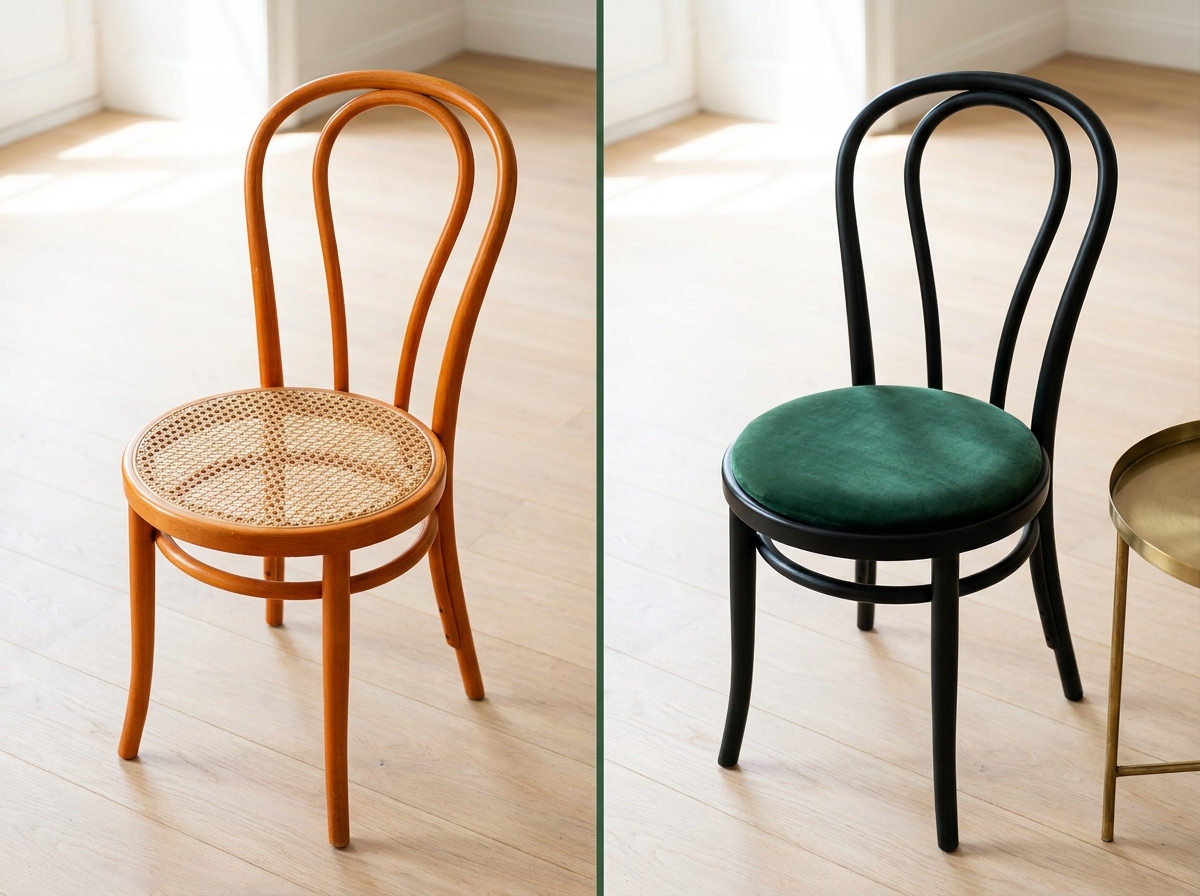
4a — Boho: flat black + bottle-green velvet
Finished in flat black + bottle-green velvet seat (DIY cushion pad, about $15). The chair turns into a statement piece that looks at home at a Parisian bistro table.
4b — Scandi: off-white + natural rush seat
Paint in off-white + natural rush seat kept as-is. Rush yellows naturally with age, and the white frame lets that warmth do the work. Beautiful around a rustic kitchen table.

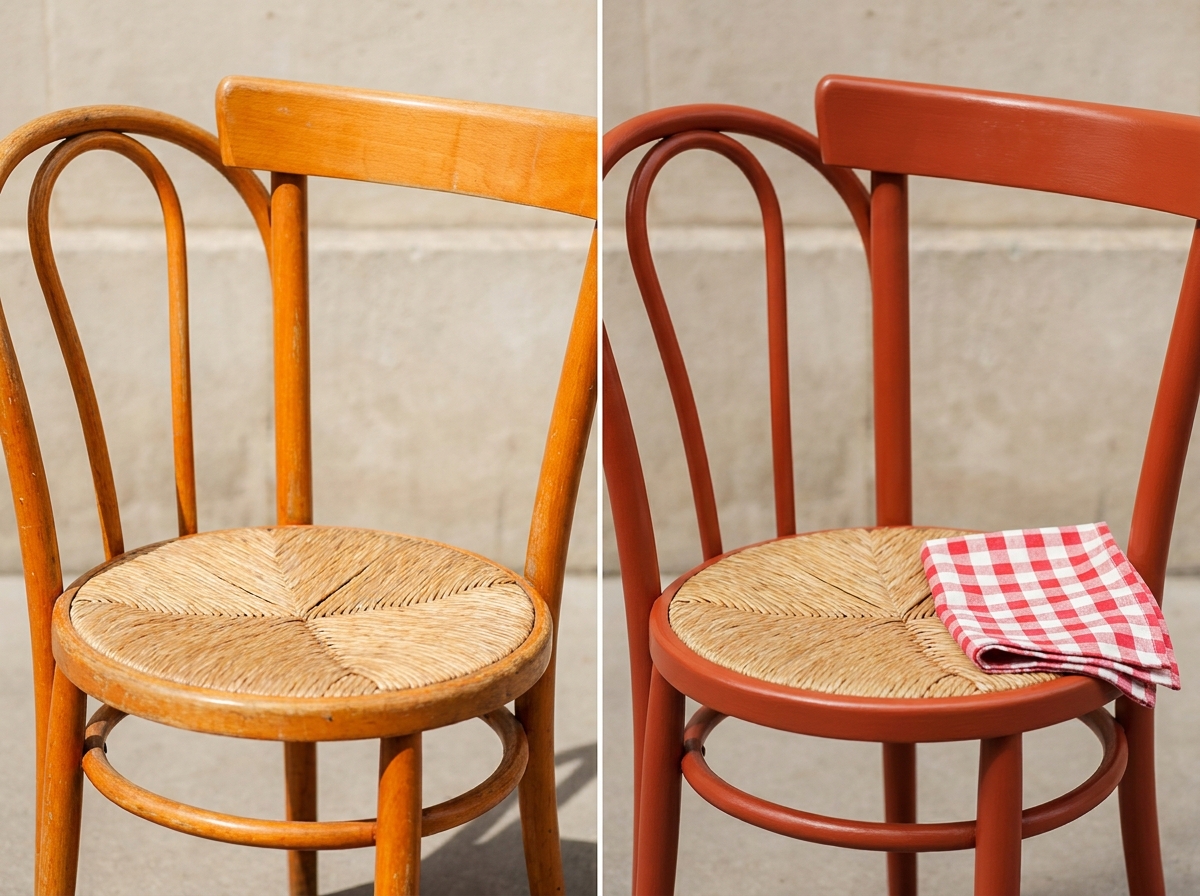
4c — Vintage: terracotta red + satin varnish
Finished in terracotta red + satin varnish on top. Reads like a Southwest café. Drops right into a mismatched chair set around a reclaimed-wood table.
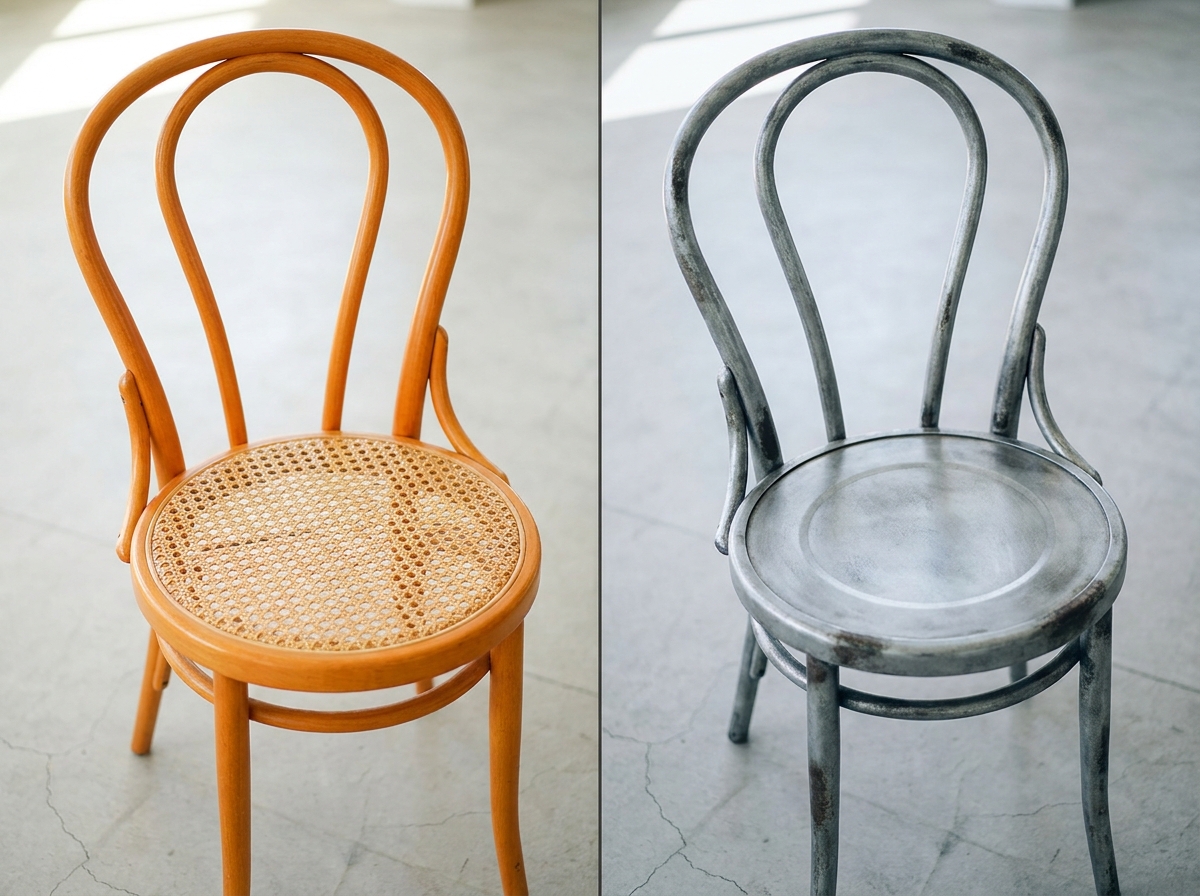
4d — Industrial: faux zinc metal effect
A faux zinc metal effect paint system (the kind Modern Masters or Liberon sell) fakes an oxidized steel bistro chair. The activator reacts with air to create uneven patches — that is what sells the illusion.
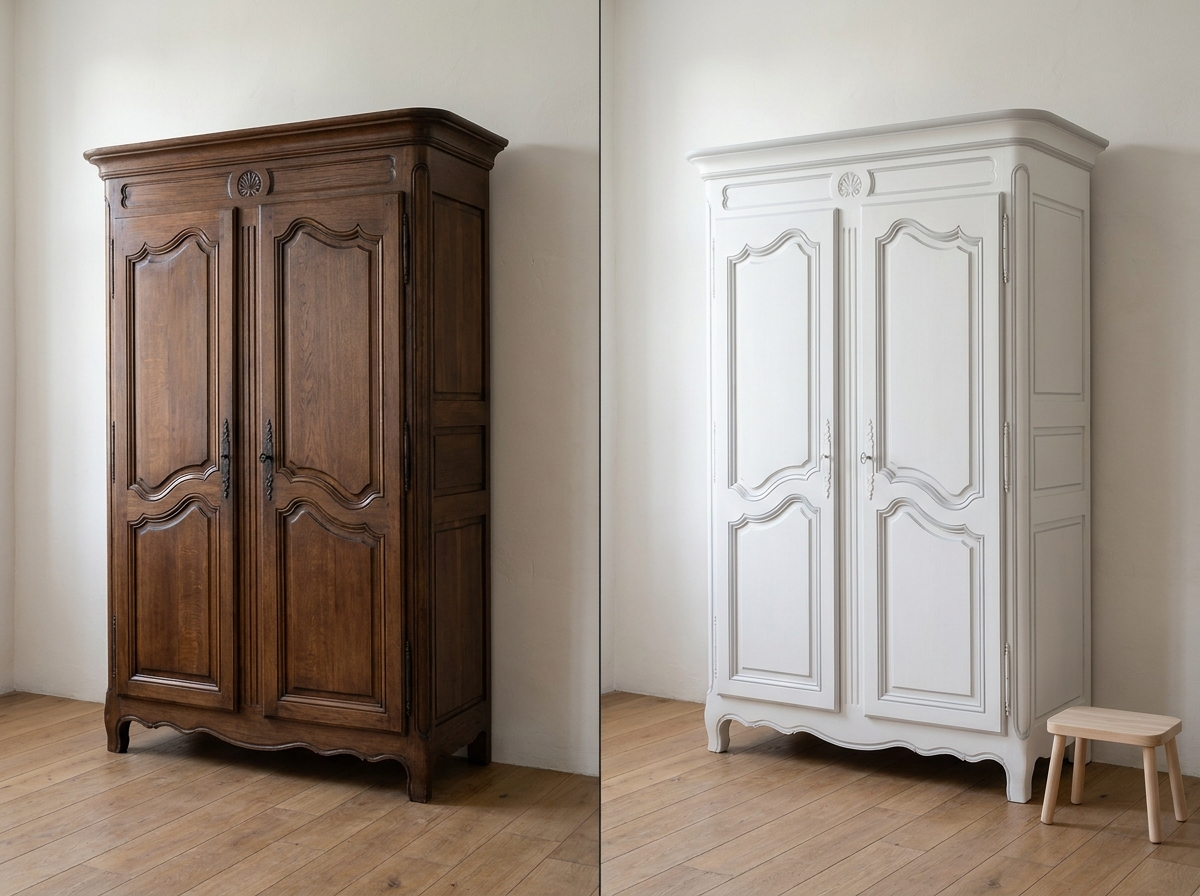
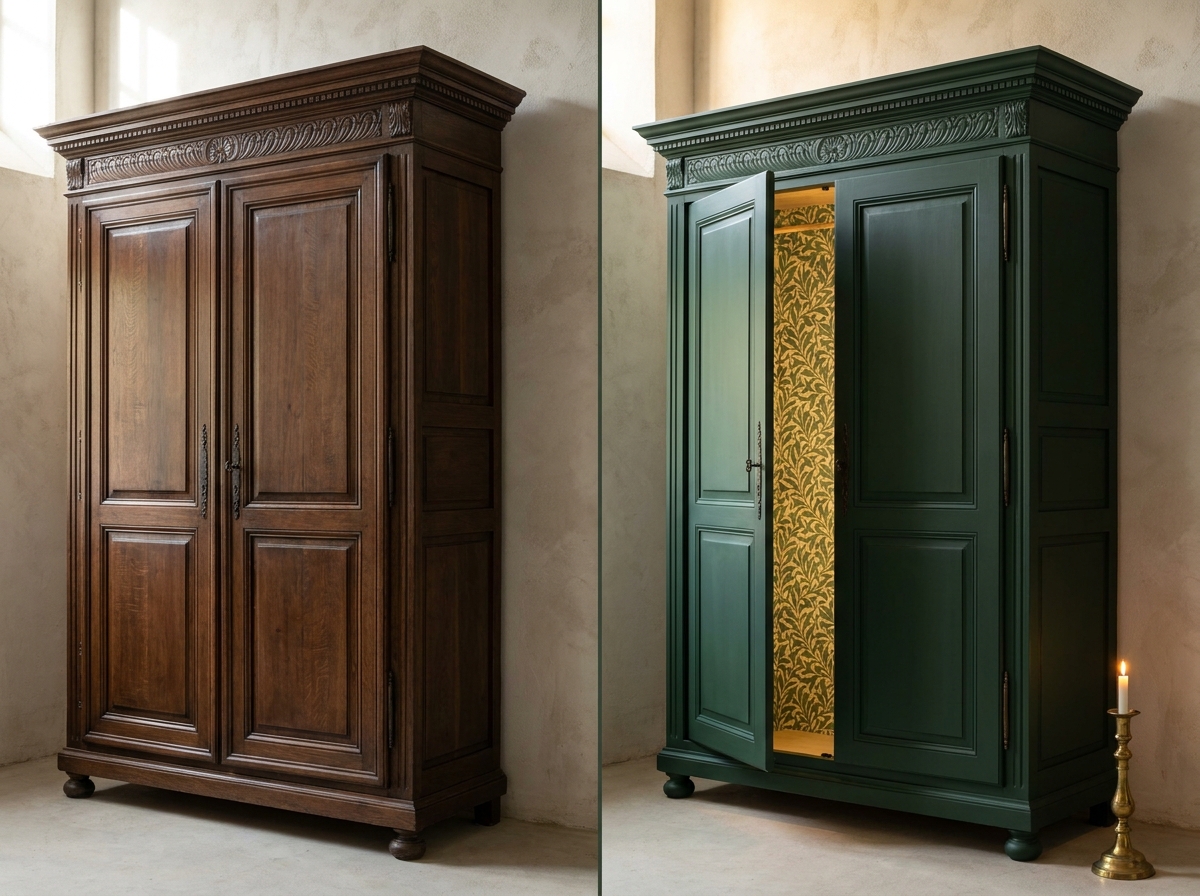
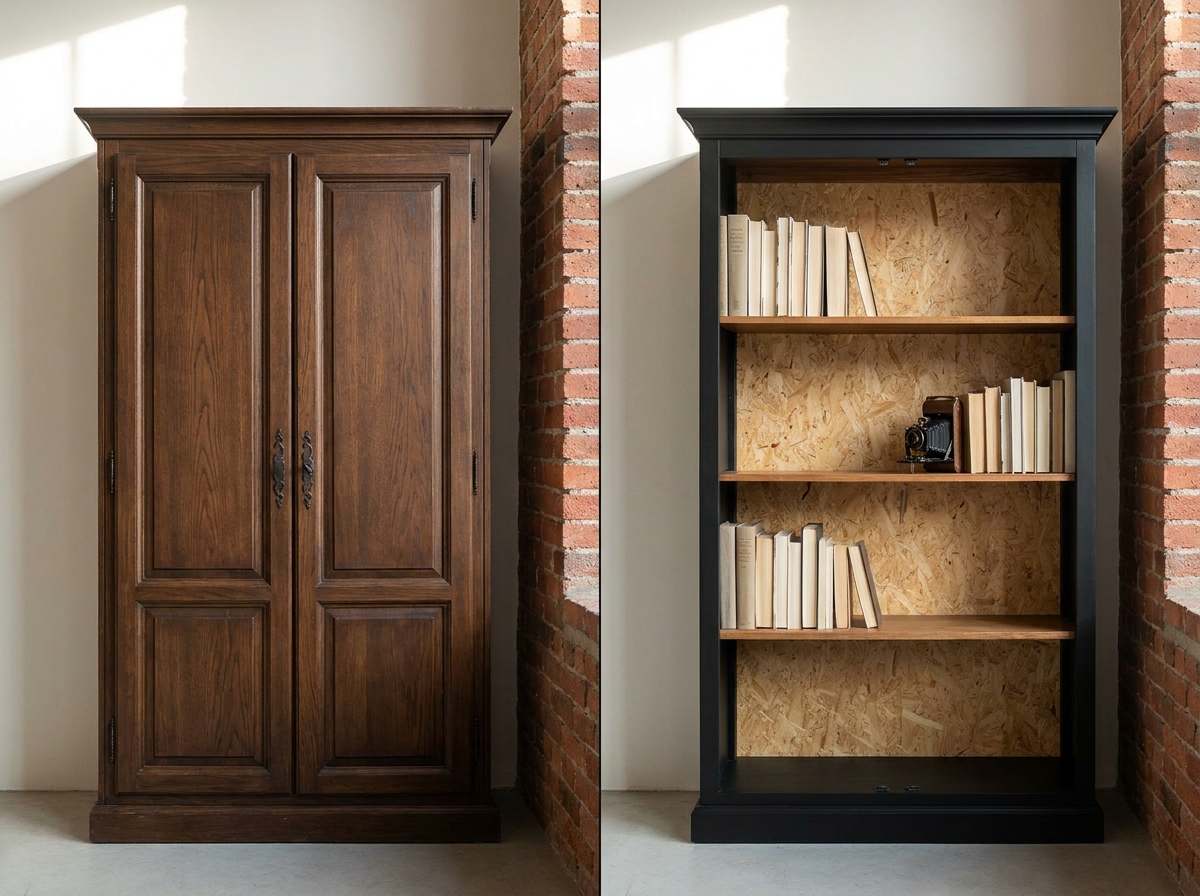
Wardrobe before and after: 4 directions on a dark armoire
A dark two-door armoire can drag down a whole room if it stays the way you inherited it. It is also the piece that benefits the most from an AI preview — because the wrong call means hauling a 200-pound cabinet back down to the garage.
5a — Scandi: white + highlighted crown
Finished in white + pearl-gray crown molding. The relief finally reads instead of disappearing into the dark stain. The piece ends up looking like a Swedish Gustavian cabinet.
5b — Boho: bottle green + botanical interior
A more daring direction: bottle green + botanical wallpaper inside (a William Morris-style print or a Hygge & West roll, roughly $50 per double roll). The inside turns into a small set whenever the doors open. Works brilliantly in a guest room.
5c — Modern: flat black + long brass pulls
The most transformative finish: flat black + long 10-inch brass pulls. The armoire becomes an architectural presence instead of a piece of furniture. Play it against a light wall. Same logic, different room: see the black kitchen piece.

5d — Loft: doors off, open shelves, OSB back
The radical option: doors removed, open shelving, OSB back, frame painted black. The armoire becomes an open bookcase. Absolutely preview this one in AI first — once the hinges come off, there is no undo.
Techniques that cover 95% of furniture makeovers
Five techniques cover almost every before and after furniture makeover you will run into. Pick based on the condition of the piece, not the style you want.
- Matte acrylic paint — the most versatile. Bonding primer is mandatory over old varnish, then two thin coats (Benjamin Moore Advance, Sherwin-Williams Emerald Urethane, Farrow & Ball Modern Emulsion). Budget $35-50 for a quart.
- Clear or tinted wax — for pieces where you want the grain to stay visible. Respects the wood, but demands a careful prep sanding. Applied with a soft cloth in thin coats.
- Reviving varnish — for a sideboard in solid shape that just needs its shine back. No heavy sanding, a dusting and one wipe-on satin coat.
- New pulls — the single highest ROI move. Four brass or leather pulls ($30-50 for the set) change the whole read of a dresser in 15 minutes flat.
- Remove a door — or swap it for caning, reeded glass, or chicken wire. Changes the piece without any paint at all.
Two-color furniture trend: how the best pairs read
Two-color furniture has been the single most-tested combination on Homeify since January 2026. Three pairings stand out:
- greige + terracotta — warm gray-beige body with terracotta drawers along the bottom. Warm, boho, ideal on a tall dresser.
- off-white + sage green — green tabletop, white legs. Airy, horizontal read, quietly modern.
- teal + brass — sideboard in teal, pulls and hand-painted trim in brass. An Art Deco signature revisited for 2026.
Rule of thumb for two-color work: always mask the seam with low-tack painter's tape (FrogTape Delicate or 3M Safe-Release), press the edge firmly with the back of a fingernail, and pull the tape while the paint is dry to the touch but not fully cured — about one hour after the last coat.
Old wood types: cherry, laminate, 1930s oak
Three categories of older pieces need a specific approach. Resale value and long-term wear depend on picking the right technique up front.
Cherry and tannin-heavy woods
Anything made of cherry (a lot of 1980s-90s traditional American dining sets) is loaded with tannins. Use a shellac-based blocking primer like Zinsser BIN or Kilz Original — without it, the knots bleed through and you get yellow ghosts in three weeks. The smartest move is often liming wax: it keeps the grain visible and sidesteps the bleed.
Laminate
Mid-century 1960s laminate (plastic-faced particleboard) needs a 120-grit scuff plus a bonding primer built for slick surfaces (Zinsser BIN, Stix). Skip that step and the paint peels off in strips. Do it right and the finish holds for ten years.
1930s oak
Genuine solid-oak 1930s wardrobes and chests often read better fully stripped than painted. Resale value drops by as much as 40% the moment an antique gets a coat of chalk paint. Preview in AI first — the wrong call can cost $200-$500 in lost value on a signed piece.
Budget and time for a weekend furniture flip
| Technique | Supplies | Time | Level |
|---|---|---|---|
| Matte acrylic paint | $40-70 | One weekend | Beginner |
| Natural wax | $30-50 | 6-8 hours | Intermediate |
| Reviving varnish | $25-40 | 2-3 hours | Beginner |
| Replace pulls only | $30-60 | 15-30 min | Beginner |
| Cane door fronts | $50-90 | One day | Intermediate |
| Two-color with tape | $60-100 | Two weekends | Intermediate |
| Full strip and refinish | $80-180 | Three days | Advanced |
Plan on $40 to $180 in supplies and a full weekend for a standard dresser. Testing 20 finishes in AI before you buy cuts out about 70% of color mistakes — that is the most common thing people say after their second flip follows a first one they regretted. For more on the wider before and after room flow, see the home staging before and after guide, and for a side-by-side of AI tools, the AI interior design tools comparison.
Before and after old bedroom furniture makeovers — FAQ
What are the best before and after makeover ideas for old bedroom furniture?
For 2026, the three most-tested bedroom directions on Homeify are sage green, deep teal, and greige (warm gray-beige). Off-white stays a safe default, and flat black is pulling ahead for wardrobes and tall dressers that you want to read as architectural.
How do I paint old wood furniture for a modern look?
Plan on $40 to $70 in supplies for a standard dresser: bonding primer, a quart of matte paint in a quality interior formula, painter's tape, sandpaper, one angled sash brush, one small roller. Add $30-60 if you swap the pulls. A full two-color flip with caning lands closer to $100. For bathrooms, add a water-resistant topcoat (around $20) — standard furniture paint alone will not survive the humidity.
Do you have to sand furniture before painting?
Not always. On a varnished piece in sound condition, a bonding primer skips the heavy sanding — a light 180-grit scuff is enough to knock off the gloss. Full strip is only required if the old paint is peeling or the varnish is thick and gummy. Previewing the final look in AI first spares you the unpleasant surprise of finding ugly repairs under the old finish.
How do I change the color of furniture without painting it?
Three options. Tinted reviving varnish (walnut, mahogany, golden oak) shifts the tone without hiding the grain. Tinted wax deepens the color gradually. And peel-and-stick vinyl (d-c-fix, Con-Tact) wraps the drawer fronts in 30 minutes and peels off clean when you change your mind.
How can I test 20 finishes before I buy the paint?
Drop a photo of the piece into Homeify on your iPhone, pick from 80+ finishes (Scandi, boho, industrial, mid-century, modern), and the app renders the result in under a minute. Same angle, same light, same piece — you are comparing apples to apples before you swipe a card at the paint counter on Saturday morning.
Test 20 finishes on your own piece with Homeify
The 20 before and after old furniture makeovers above were generated on five real pieces. Your dresser, your buffet, or your inherited armoire deserves the same treatment before you give up a weekend to it. Install Homeify on your iPhone, snap a photo, and test 20 directions in one evening. You will know which color to pick up at the hardware store Saturday morning — and you will skip the $70 of paint that otherwise ends up abandoned on a basement shelf.
Related Articles
Was this article helpful?
Download Homeify Free
Transform any room with AI — download Homeify and start redesigning your home for free. The AI room design app trusted by thousands on iOS.
