Updating Oak Cabinets Without Painting: 6 Fixes 2026
Updating oak cabinets without painting: 6 honey oak fixes, $50 to $1,500, full reversibility chart, no brush needed. AI-tested on the same kitchen.
Updating oak cabinets without painting in 2026 means working through 5 budget tiers from $50 to $1,500, no paint: refinish, gel stain darker, replace doors only, swap hardware, peel-and-stick backsplash, vinyl countertop overlay. Test all six on a photo of your honey oak kitchen with Homeify before spending $75 at Home Depot.
How to update oak cabinets without painting: the 6-pillar method
The US SERP for "updating oak cabinets" almost always defaults to "just paint them" — even when the user explicitly types "without painting." This article takes the constraint at face value: 6 no-paint moves tested in 2026 on the same honey oak kitchen, from a $50 wax revival to a $700 door swap. None of them require drop cloths, sanding to bare wood, or oil-based primer.
Painted oak loses three ways. The grain disappears under enamel and never comes back. Renters who paint a landlord's cabinets are kissing the security deposit goodbye on move-out day. And honestly, a lot of homeowners like wood — they just want their kitchen to stop feeling like a 1992 time capsule, not erase the material entirely. So before you drop $75 on a quart of cabinet enamel at Lowe's and stare at the wrong shade for the next two years, test the look on your own photo before buying anything in Homeify. The 6 pillars below are all DIY in a single weekend each, and the decision grid (reversibility × budget × skill level) at the bottom helps you pick which ones to combine.
For the broader logic of staging a kitchen makeover by budget tier (paint included), see the parent guide on the kitchen makeover budget tiers — this article is the no-paint satellite of that hub.
Pillar 1 — Refinish the oak with stain or wax ($50, fully reversible)
Before doing anything else, the oak deserves a clean and a finish refresh. A lot of cabinets read as dated because the original topcoat is dull, sticky, and yellowed — not because the wood itself is ugly. A wax-based revival changes the entire kitchen in half a day for less than the cost of a Costco run.
The process — 4 hours, no demo
Most cabinets that read as "dated" are not actually ugly wood — they're dirty wood under a tired topcoat that yellowed sometime around the Clinton administration. Strip the gunk first. Wipe everything down with TSP or Krud Kutter, rinse, and walk away for two hours while it dries. Skip the sandpaper entirely; reach for 0000 steel wool instead, because the goal is to scuff the existing finish, not cut through it. Then load up a lint-free rag with a tinted hard wax or oil — Howard Feed-N-Wax, Briwax Dark Brown, Howard Restor-A-Finish in Walnut, or Minwax Paste Finishing Wax tinted all do the job — and work it across the grain in two passes. Buff thirty minutes later. The orange softens, the grain comes forward, and that plastic-y 1980s glaze that nothing seems to fix? Gone.
What it actually costs
Plan on $15 to $25 for an 8 oz can of tinted wax (covers about 80 sq ft, enough for ten cabinet fronts). Add TSP, steel wool, and rags and the total stays under $50. Service life: 4 to 6 years before another pass. And the whole thing is 100% reversible — no trace of it left behind if you decide later to replace the doors.

Pillar 2 — Stain honey oak darker with a gel stain ($80)
The single biggest tell on a 1980s or 1990s honey oak kitchen is the orange undertone — that's the part that immediately reads as dated. The no-paint fix: shift the oak one or two shades darker with a gel stain. The wood is still wood, the grain is still visible, but the kitchen slides into 2026 instead of staying stuck in 1992.
Which gel stain to pick
General Finishes Java Gel Stain is the US workhorse for this exact problem — read any DIY blog from the last decade about updating honey oak cabinets and it's the top pick. Minwax PolyShades Espresso is the budget alternative. Either one wipes onto cleaned, scuffed oak with a foam brush or a clean rag — no stripping. One coat brings the tone down by a single shade; two coats lands a deep amber-brown. Always test on the inside of a door first to confirm the final color over your existing finish.
Why this works visually
You end up with oak that's 1 to 2 shades darker without hiding the grain — the visual effect lines up almost exactly with the smoked-oak fronts that high-end kitchen brands sell at $400 a door. Pair this with pillar 4 (brass or matte-black hardware), and the whole room shifts from "grandma's kitchen" to "modern bistro" in a single weekend.
Pillar 3 — Replace the cabinet doors only ($700 — the highest-impact pillar)
If a single move sums up how to update oak cabinets without painting, this is it: keep the cabinet boxes (40% of what you would otherwise pay for a kitchen, 0% of what anyone actually sees) and replace only the doors and drawer fronts. The most radical no-paint pillar, and the highest visual delta per dollar. The query kitchen updates with oak cabinets pulls 140 monthly searches in the US per Semrush 2026-04 — the demand is mature.
Three sources for replacement doors
Source one: IKEA Sektion door fronts directly, if your boxes are Sektion-spec. Source two: third-party fronts cut to Sektion spec — Semihandmade, Reform, Plum Living, and Norse Interiors all ship doors in oak veneer, white oak slab, MDF shaker, or matte black PET, with hinge holes pre-drilled. Expect $45 to $90 per door from IKEA Sektion or Semihandmade for stock sizes. Source three: a local cabinet shop building custom doors in poplar, white oak, or MDF — $120 to $280 per door, three to five weeks of lead time.
Cabinet box compatibility — the check that saves $700
Before ordering: measure door height, width, and the existing hinge cup positions. Most US oak cabinets from the 1980s and 1990s use 35 mm cup hinges — the European standard, which means almost any modern replacement door will mount without re-drilling. Older face-frame cabinets with non-Euro hinges are the exception; in that case, source two or three is mandatory. For ten doors plan on $700 at Sektion-equivalent quality, $1,500 to $2,500 for solid white oak from a third-party builder, $3,000+ for full custom.
Reversibility — partial only
Renter note: replacing the doors is not reversible if you toss the originals. The workaround is unglamorous but free — store the original honey oak doors in the garage or basement, mount them back on for the move-out walkthrough. A permanent investment becomes a temporary one. For more removable refresh ideas across the rest of the home, see the companion gallery on furniture before and after transformations covering dressers, sideboards, and other cabinetry.

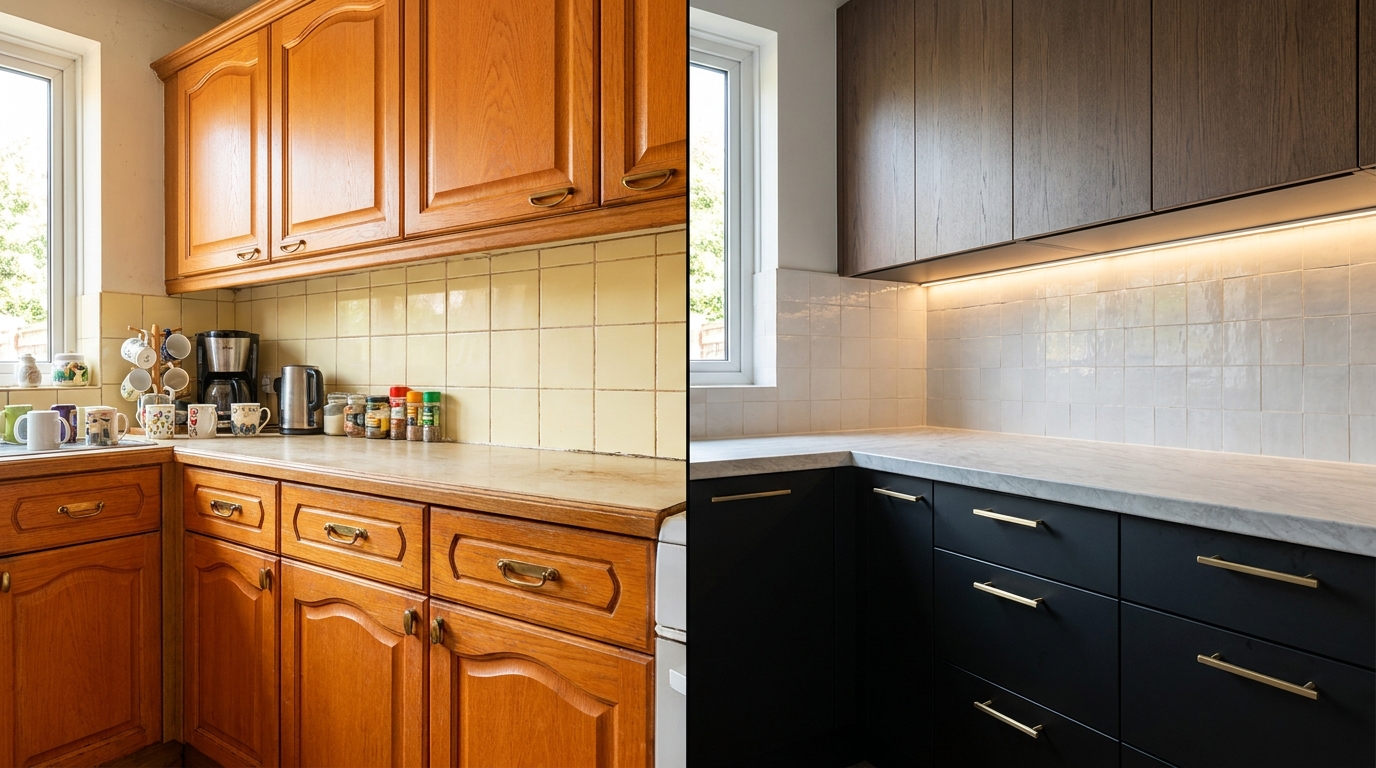
Pillar 4 — Swap the cabinet hardware ($50 for 8 pulls, renter-safe)
The shortest, highest-leverage move on the list. 15 minutes, two screws per pull, and the kitchen jumps a decade. Nobody consciously notices cabinet hardware — but the difference between brass knobs from 1992 and matte-black bar pulls reads on a kitchen the same way the wrong frame reads on a piece of art.
Measure the center spacing first
The classic mistake: buying gorgeous pulls with the wrong center spacing and ending up filling and re-drilling. Measure the distance between the centers of the two existing screw holes — almost always 3 inches (76 mm) on cabinet doors and 5 inches (128 mm) on wider drawers in US kitchens. Order replacements with matching center-to-center spacing (3 inches or 5 inches) and you never touch a drill. A screwdriver is the only tool that comes out of the toolbox.
Which finishes work in 2026
Budget first, because hardware is one of the few categories where price and look correlate badly. Stocked bar pulls at Home Depot, Lowe's, or Amazon run $30 to $90 for 8 pulls and cover 90% of decent options. Step up to Rejuvenation, Schoolhouse, or Anthropologie and you're looking at $80 to $200 for the same eight pulls in heavier solid brass with cleaner machining. Etsy sits in a different lane — independent makers selling small-batch pieces at $8 to $15 each, often the only place to find honest unlacquered brass that will patina rather than chip. As for finish: unlacquered brass is the call on darker oak in 2026, because the warmth of the metal matches the warmth of the wood while the bar shape pulls the kitchen forward by 30 years. Lighter or whitewashed oak takes matte black better than brass. Cognac leather strap pulls from Hardware Renaissance or House of Antique Hardware are the wildcard — they read artisan, not rustic, and they shine on shaker doors. Renters, the whole pillar is yours for free: drop the original pulls and screws in a labeled freezer bag, screw the new ones in, and you're 100% reversible on move-out day.
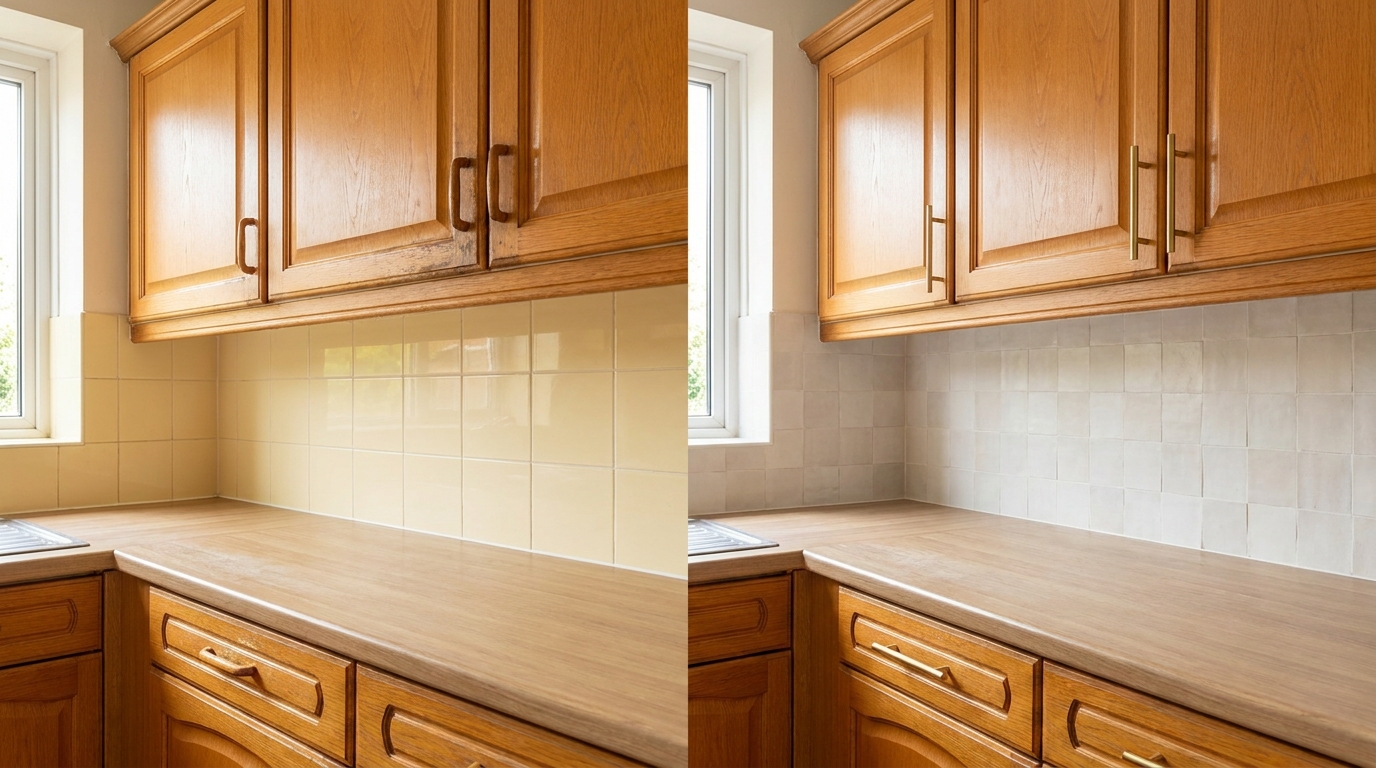
Pillar 5 — Peel-and-stick backsplash over the old tile ($150)
Of every no-paint move on the list, peel-and-stick backsplash is the one that delivers the most visible change for the lowest price — no demolition, no thinset, no grout, no tools beyond a straightedge and a utility knife. Honey oak cabinets paired with a 1990s 4x4 ceramic tile backsplash carry most of the dated read; replacing just the backsplash skin lifts both at once.
How to install over existing tile
Vinyl peel-and-stick (Smart Tiles, d-c-fix, Aspect, Beija Flor) goes directly over an existing tile backsplash if the surface is clean, dry, and degreased. Measure, cut, peel the liner, press from top to bottom, work the bubbles out with a felt squeegee. Plan on $15 to $25 per linear foot (covers 18 inches of height) at Home Depot or Amazon. For 10 linear feet of backsplash that's $150 to $250 in material, plus $20 in cutter, level, and squeegee. Service life: 5 to 7 years. Removal: warm with a hair dryer first, peel slowly — comes off without residue if the original tile was sealed.
Patterns that work with honey oak
Three families dominate in 2026 over oak: zellige white in a matte uneven tile (artisan vibe, gorgeous against a dark-waxed oak), cement-tile geometric in navy or terracotta (adds the color the wood refuses to take), and Carrara marble veining in white (minimal, sharp contrast against warm wood). Avoid red brick and faux wood-plank backsplashes — they double down on the rustic-dated read you're trying to leave behind. For deeper, moodier kitchens, the black kitchen inspiration gallery shows when a darker palette pulls the room together.
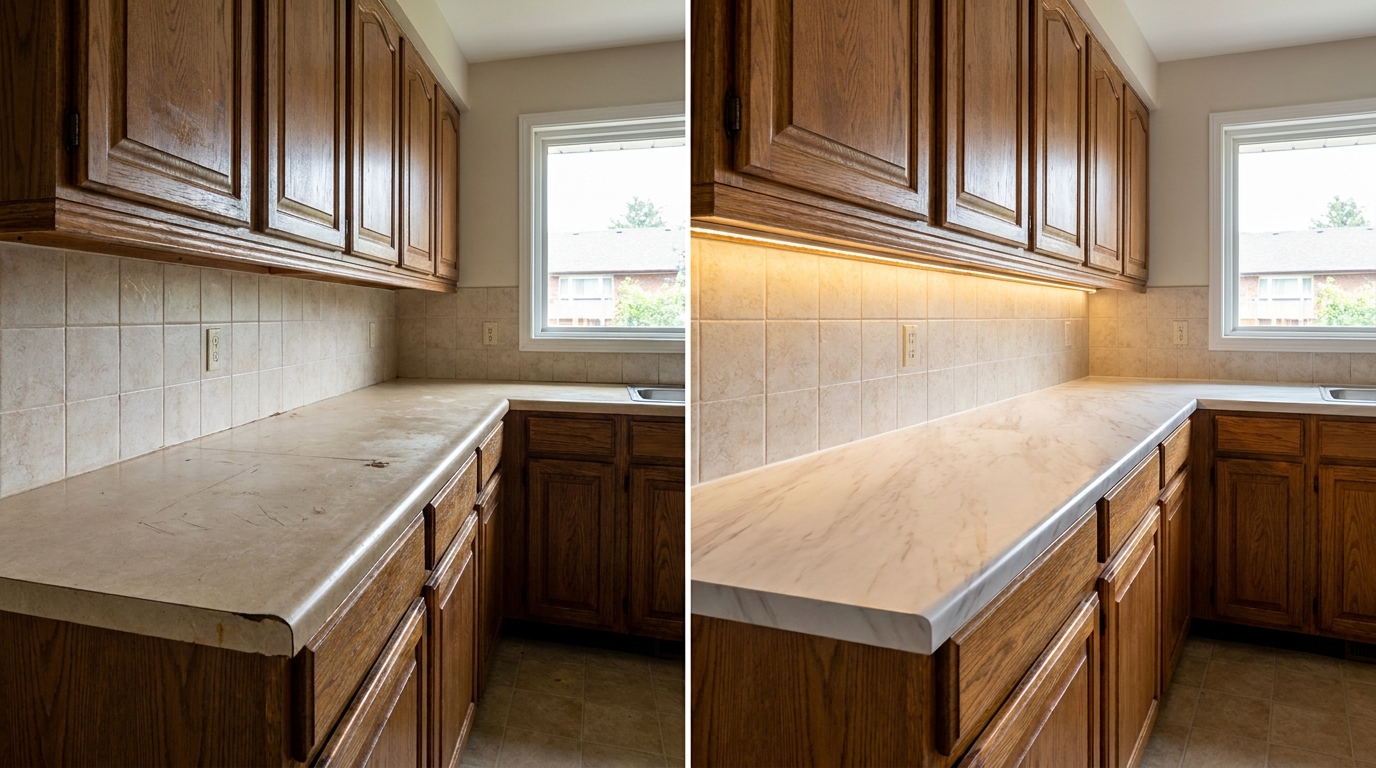
Pillar 6 — Countertop overlay + under-cabinet LEDs ($220)
Last no-paint pillar, and the one that pulls the whole room together: a lighter countertop in place of the worn 1990s laminate, plus warm task lighting that puts the oak grain back in the spotlight. Without ripping anything out, without touching the sink plumbing.
Countertop vinyl — the 2026 build
Countertop-grade vinyl (d-c-fix Premium, Stone Coat Countertops adhesive, OraCal grease-resistant) now holds up to water and to heat up to 195°F. Sand the laminate with 240-grit, degrease, lay the marble-effect vinyl over sanded laminate front to back, working out air bubbles with a squeegee. Plan on $35 per linear foot for a 25-inch deep counter — about $100 to $140 for a typical US galley kitchen. Service life: 4 to 6 years with normal use, never cut directly on it, always use a trivet for hot pans. The full Stone Coat epoxy alternative runs $200 to $300 and lasts 10+ years if you have the time and patience for the cure cycle.
Under-cabinet LEDs — the "designed kitchen" effect
A 3000K LED strip under wall cabinets (warm white — never 4000K, which makes the kitchen feel like a hospital exam room) costs $30 to $50 in a plug-in kit at Home Depot (Govee, Philips Hue, IKEA Mittled) with adhesive backing and an inline transformer. Install in 30 minutes — peel, stick, plug into the outlet behind the cabinet, done. The grazing light pulls the oak grain forward and lights the new backsplash from above. From Homeify visual A/B tests on identical kitchens in 2026, adding a 3000K under-cabinet strip lands at roughly +40% perceived brightness on the work surface (estimated by Homeify from comparative AI previews on the same kitchen photo).
Budget × reversibility × DIY skill: the decision grid
Updating honey oak cabinets without painting splits cleanly into 5 budget tiers. Renters: fully reversible through pillar 4 (hardware swap). Pillar 3 (replacement doors) is reversible only if you store the originals. Pillar 6 countertop vinyl is partly reversible — the LEDs are 100% renter-safe.
| Pillar | Budget | Reversibility | DIY skill | Time to install |
|---|---|---|---|---|
| 1 — Refinish wax/oil | $50 | Full | No tools | Half a day |
| 2 — Gel stain darker | $80 | Partial (darker shade is permanent) | No tools | 1 day |
| 3 — Replacement doors | $700 (Sektion-grade) | Partial (store originals) | Advanced DIY | 1 weekend |
| 4 — Hardware swap | $50 (8 pulls) | Full | Beginner DIY | 30 min |
| 5 — Peel-and-stick backsplash | $150 | Full | Beginner DIY | Half a day |
| 6 — Countertop vinyl + LEDs | $220 | Full (LEDs) / Partial (countertop vinyl) | Intermediate DIY | 1 day |
| Full combo | $1,250 to $1,500 | Mixed | Intermediate DIY (pillar 3 is the hardest link) | 3 to 4 weekends |
Quick read for the renter who wants to update honey oak cabinets without painting and protect the deposit: pillars 1, 4, and 5 (refinish + new pulls + peel-and-stick backsplash) for a $250 spend, all of it reversible in an afternoon. Quick read for the homeowner who wants the maximum no-paint upgrade: stack all six pillars at $1,500 — under 15% of the cost of a new $10,000 kitchen install. The pillar that earns its money the fastest is #3 (replacement doors): if the original oak fronts are physically beat-up, that's the only move that actually delivers a "new kitchen" read. To frame this budget against a broader staging context, see the before-and-after renovation guide.
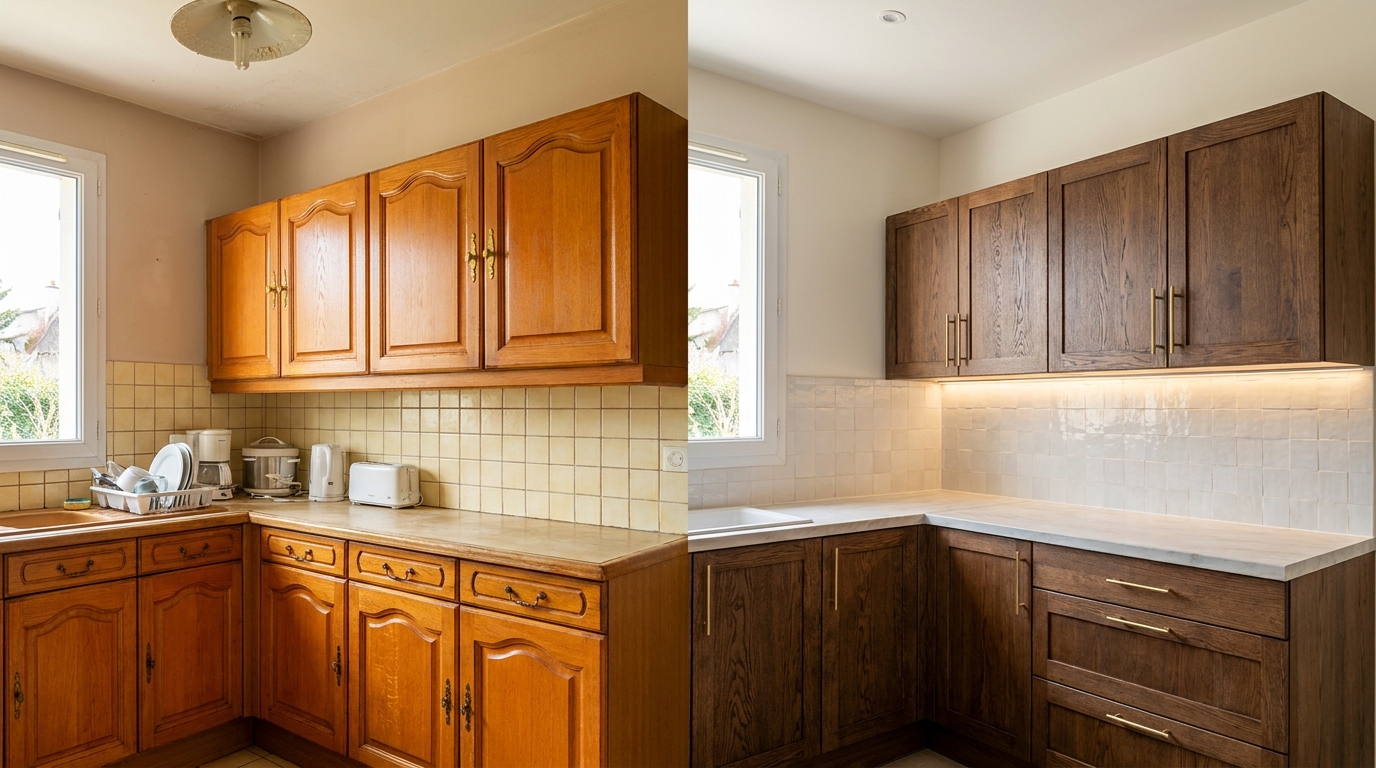
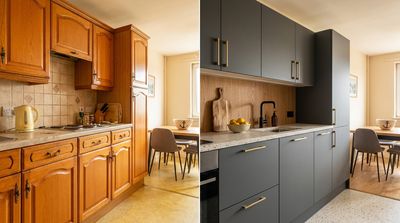
The full $1,500 combo: same honey oak, six no-paint moves later
If you want a real updating oak kitchen cabinets before-and-after with no demo, this is where it lands. Stacked together, the six pillars turn the same honey oak kitchen with no paint anywhere into a different room: white-oak slab replacement doors, brushed-brass bar pulls, zellige-white peel-and-stick backsplash, marble-vinyl countertop, 3000K under-cabinet LEDs. Above all of that, the original cabinet boxes — invisible, untouched, and the reason you saved roughly 60% of what a full kitchen install would have cost.
Total spend stays under $1,500 total ($50 + $80 + $700 + $50 + $150 + $220 = $1,250, plus around $200 in glue, level, blades, screws, and a fresh squeegee). Compared to a $10,000–$15,000 mid-range kitchen install through a contractor, you sit at roughly 80% of the visual impact for under 15% of the cost. The catch: you have to pick the right combination — wrong gel-stain shade plus a clashing backsplash can land you back at "meh" for $1,500. The AI preview on your own photo is the cheapest insurance against that.
No-paint full combo ($1,500)
All six no-paint pillars stacked on the same honey oak cabinets. Boxes preserved, zero brushwork.
- 3 to 4 weekends of solo DIY
- No sanding to bare wood, no oil-based primer
- Renter deposit preserved if doors are stored
- Wood grain stays visible — the oak character survives
- Previewable on your own kitchen photo before you buy
Paint the cabinets ($400)
The default 80% of the US SERP recommends. Bonding primer + 2 to 3 coats of cabinet enamel.
- 1 to 2 weekends of DIY
- 120-grit sand + bonding primer mandatory
- Painted oak is irreversible — bad for renters
- Wood grain disappears under an opaque coat
- $75 of paint plus 6 hours of work if the color doesn't land
Brand-new kitchen ($10,000+)
Demolish the old kitchen, install new boxes, doors, counter, backsplash, and pro labor.
- 3 to 6 weeks of contractor schedule
- Kitchen offline for 2+ weeks, demo dust everywhere
- 100% of the visual impact (+20% over the no-paint combo)
- Locked in once the deposit lands — no real reverse gear
- Resale bump only 1 to 3% of home value (NAR/Zillow)
Frequently asked questions
How can I update oak cabinets without painting them?
Stack six no-paint moves: a tinted wax or gel stain to refresh the wood, replacement doors only on the existing boxes, new pulls, peel-and-stick backsplash, vinyl countertop overlay, and warm 3000K under-cabinet LEDs. Plan on $50 to $1,500 depending on how many pillars you stack. No — not a single brush stroke of paint required. The whole point is keeping the wood visible.
How do you modernize honey oak cabinets without painting?
Three moves cover 80% of it: shift the oak one shade darker with a Java gel stain ($80), swap the brass-and-oak knobs from 1992 for matte-black or unlacquered-brass bar pulls ($50), drop a zellige-white or cement-tile peel-and-stick backsplash over the old tile ($150). Total $280, one weekend, no tools beyond a screwdriver and a utility knife. The wood stays wood, the kitchen reads as 2026.
Can you stain over oak cabinets without painting?
Yes — that's exactly what gel stain is built for. General Finishes Java Gel Stain or Minwax PolyShades wipes on over a cleaned, lightly scuffed existing finish (no full strip needed) with a foam brush or rag, dries in 8 to 24 hours, and shifts the oak one to two shades darker per coat. The grain stays visible underneath. Always test the final look on the inside of one door before committing to all ten.
How do you make oak cabinets look modern?
Three moves in order from cheapest to most impactful: a wax revival or gel stain ($50 to $80) that strips off the dated 1980s sheen and either deepens or modernizes the tone, then matte-black or unlacquered-brass bar pulls ($50) to fix the hardware era, then a peel-and-stick zellige or marble backsplash ($150) to replace the dated 4x4 tile. Most honey oak kitchens read as dated because the finish is yellowed and the hardware is from 1992 — not because the oak itself is the problem. That's the move no competitor mentions first.
How much does it cost to update oak cabinets without painting?
Between $50 (single pillar — wax revival) and $1,500 (full six-pillar combo with replacement doors). The renter sweet spot is $250 (refinish + pulls + peel-and-stick) — fully reversible. The homeowner sweet spot is $1,250 for a "new kitchen" read with zero demo. Compare against $10,000 to $15,000 for a contractor-installed mid-range kitchen.
Can you update oak cabinets with a peel-and-stick backsplash?
Yes, and it's the single highest-leverage no-paint move on a honey oak kitchen. Three patterns play well with oak: matte zellige white (artisan, soft contrast against dark-waxed oak), navy or terracotta cement tile (adds the color the wood refuses to absorb), Carrara-veined marble (sharp minimal contrast against warm wood). Avoid red brick and faux-wood plank — they reinforce the rustic-dated read you're trying to leave behind. Service life is 5 to 7 years, and removal is residue-free if you warm the vinyl with a hair dryer first.
How do I test these 6 fixes on my own kitchen before buying?
Upload a photo of your current honey oak kitchen into Homeify on iPhone. The AI generates each pillar variant on your exact room — same angle, same light, same appliances. Before dropping $700 on replacement doors or $150 on a backsplash roll, the visual preview on your own photo is what catches the bad combinations (wrong stain shade × clashing backsplash × wrong hardware finish) that no product page ever shows you side by side.
Test 6 honey oak finishes on your kitchen before you buy
Every pillar in this article was generated by AI on the same base honey oak kitchen — the only honest way to compare what each no-paint budget actually buys. Before picking up that $20 can of Java gel stain, the $150 roll of peel-and-stick, or the $700 set of replacement doors, install Homeify on iPhone, shoot a photo of your current kitchen, and let the app render every pillar on your exact room. You'll know which one to throw in the cart Saturday morning at Home Depot — and the $700 that would have ended up on a garage shelf because the tone clashed with your floor tile stays in your bank account.
Related Articles
Kitchen Makeover: The 4-Tier Budget Guide (2026)
Apr 27, 2026
Was this article helpful?
Download Homeify Free
Transform any room with AI — download Homeify and start redesigning your home for free. The AI room design app trusted by thousands on iOS.
